
Kubernetes ClusterIP service explained (with YAML examples)
Learn how Kubernetes ClusterIP services work. The default service type for internal cluster communication covers selector configuration, port vs targetPort, and working YAML examples.
4 lessons · 11 min · Advanced
Written by

Marketing Team at Civo
Written by
Marketing Team at Civo
ClusterIP is the default Kubernetes Service type. When you create a Service without specifying a type, you get a ClusterIP. It assigns a stable virtual IP address that is only reachable from within the cluster. Traffic from outside the cluster cannot reach a ClusterIP Service directly.
Use ClusterIP for communication between services inside your cluster: your frontend connecting to your backend, your application connecting to a database, or any workload that should only be reachable by other pods.
How ClusterIP works
A ClusterIP Service does two things. It provides a stable virtual IP address (the ClusterIP) that does not change even when the pods behind it are replaced. And it uses a label selector to discover which pods to route traffic to, updating its endpoint list automatically when pods are created, updated, or deleted.
Port vs targetPort
This is the most commonly misunderstood aspect of Services.
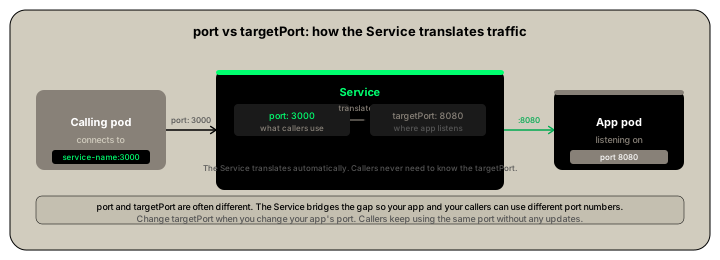
port is the port the Service itself listens on. This is what other pods use to connect to the Service.
targetPort is the port the application inside the pod is listening on. This is where the Service forwards traffic to.
They are often different values. For example, your Service might listen on port 3000 (a clean, predictable port for callers) while your application inside the pod runs on port 8080 (whatever the application was written to use). The Service translates between the two automatically.
Other pod connects to: service-name:3000Service forwards to: pod-ip:8080
Working example
Create a namespace and deployment:
kubectl create namespace examplekubectl create deployment node-application --image=node:18 --port=8080 -n examplekubectl label deployment node-application run=node-application -n example
Create the ClusterIP Service:
apiVersion: v1kind: Servicemetadata:name: node-applicationnamespace: examplespec:type: ClusterIPselector:run: node-applicationports:- name: httpprotocol: TCPport: 3000targetPort: 8080
kubectl apply -f service.yaml -n example
Verify the Service and pods are running:
kubectl get all -n example
Expected output:
NAME READY STATUS RESTARTS AGEpod/node-application-6b7f9d8c5-abc12 1/1 Running 0 30sNAME TYPE CLUSTER-IP EXTERNAL-IP PORT(S) AGEservice/node-application ClusterIP 10.96.145.23 <none> 3000/TCP 10s
The ClusterIP 10.96.145.23 is only reachable from within the cluster. Other pods can connect to the Service at node-application.example.svc.cluster.local:3000.
Check the pods and their IP addresses:
kubectl get pods -o wide -n example
Check the endpoints the Service has discovered:
kubectl get endpoints -n example
Expected output:
NAME ENDPOINTS AGEnode-application 10.244.1.5:8080 15s
The endpoint shows the pod IP and the targetPort (8080), not the Service port (3000). This confirms the Service is correctly translating between port 3000 (callers) and port 8080 (the application).
How the Service discovers pods
The selector field in the Service YAML is the key:
selector:run: node-application
Any pod with the label run: node-application becomes an endpoint for this Service. When a pod is rescheduled and gets a new IP address, the Service automatically updates its endpoint list. You never need to update the Service configuration when pods change.
Accessing the Service from within the cluster
From another pod in the same namespace:
curl node-application:3000
From another namespace:
curl node-application.example.svc.cluster.local:3000
To test from your local machine during development, use port-forward:
kubectl port-forward service/node-application 3000:3000 -n example
Then open http://localhost:3000 in your browser.

Marketing Team at Civo
Civo is the Sovereign Cloud and AI platform designed to help developers and enterprises build without limits. We bridge the gap between the openness of the public cloud and the rigorous security of private environments, delivering full cloud parity across every deployment. As a team, we are dedicated to providing scalable compute, lightning-fast Kubernetes, and managed services that are ready in minutes. Through CivoStack Enterprise and our FlexCore appliance, we empower organizations to maintain total data sovereignty on their own hardware.
Our mission is to make the cloud faster, simpler, and fairer. By providing enterprise-grade NVIDIA GPUs and streamlined model management, we ensure that high-performance AI and machine learning are accessible to everyone. Built for transparency and performance, the Civo Team is here to give you total control over your infrastructure, your data, and your spend.
Share this lesson