In this tutorial you will learn how to use GitOps to deliver your applications to a Civo Kubernetes cluster.
The tutorial covers all steps, and uses Gimlet CLI to manage a GitOps repository. Gimlet CLI is a command line tool that packages a set of conventions and matching workflows so you can manage the GitOps repository effectively.
Prerequisites
- You need to have a running Civo Kubernetes cluster to complete this tutorial. If you do not yet have an account, you can sign up here. Once you have a cluster running, make sure you have the KUBECONFIG set and pointing to this cluster. For more detail, refer to "your cluster kubeconfig" here.
- You need to have a free GitHub account, or any other git provider that you know enough to translate the Github configuration instructions in this guide to the provider of your choice.
One other thing that you will need for GitOps, is a git repository. We will create that next.
Let's start by creating a git repository
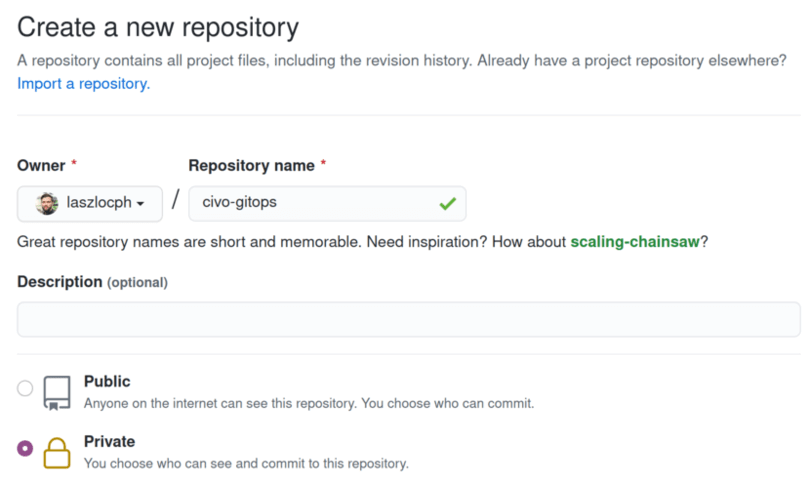
Create a private git repository on Github where you will store the application deployment manifests in your GitOps setup. civo-gitops could be a suitable name for it.
This repository has to be separate from your application source code repository, as it will store the manifests of all of your application deployments. Capturing the state of your apps and environments and any changes to them, it will manage the deployment.

Now that you have a GitOps repository, let's bootstrap the GitOps deployment cycle.
Bootstrap the GitOps deployment cycle
In GitOps, instead of applying application manifests directly on the cluster, you write them to a git repository. The GitOps controller will be the one deploying your manifests on the cluster based on changes in the repository.
The GitOps controller is a control loop that monitors the state of the GitOps repository and applies any new changes on the cluster.
With this structure, your deployment process gets a set of nice properties: - a complete audit log of your deployment actions - a familiar toolchain - git - as the primary means to manage deployments - the GitOps control loop is in a better position to recover from errors than predefined CI jobs - writing the desired cluster state to git allows for a new class of deployment tools with advanced features
In this tutorial we are going to use Flux V2 as the GitOps controller, and use the Gimlet CLI to bootstrap it.
Download Gimlet CLI
Gimlet CLI packages a set of conventions and workflows so you can manage the GitOps repository. You can learn more about Gimlet CLI on https://gimlet.io.

Fetch it and install it with the following commands:
$ curl -L https://github.com/gimlet-io/gimlet-cli/releases/download/v0.3.0/gimlet-$(uname)-$(uname -m) -o gimlet
$ chmod +x gimlet
$ sudo mv ./gimlet /usr/local/bin/gimlet
$ gimlet --version
Clone your GitOps repository and bootstrap GitOps
Now, we will clone your GitOps repository that you just created on GitHub, and place the GitOps controller yaml files in it with the gimlet gitops bootstrap command.
The bellow example initializes a logical environment. This is going to be your staging environment. Make sure to change the repository name to be the one you created earlier.
$ git clone git@github.com:laszlocph/civo-gitops.git

$ gimlet gitops bootstrap \
  --env staging \
  --gitops-repo-path civo-gitops \
  --gitops-repo-url git@github.com:laszlocph/civo-gitops.git
If you set your gitops-repo-path to the local copy of your GitOps repo and gitops-repo-urlto the remote location, you should see a similar output to this:
⏳ Generating manifests
⏳ Generating deploy key
✔️ GitOps configuration written to civo-gitops/staging/flux

👉 1) Push the configuration to git
👉 2) Add the following deploy key to your Git provider

ssh-rsa AAAAB3NzaC1yc2EAAAADAQABAAACAQC1593b2v[...]

👉 3) Apply the gitops manifests on the cluster to start the gitops loop:

kubectl apply -f civo-gitops/staging/flux/flux.yaml
kubectl apply -f civo-gitops/staging/flux/deploy-key.yaml
kubectl wait --for condition=established --timeout=60s crd/gitrepositories.source.toolkit.fluxcd.io
kubectl wait --for condition=established --timeout=60s crd/kustomizations.kustomize.toolkit.fluxcd.io
kubectl apply -f civo-gitops/staging/flux/gitops-repo.yaml

         Happy Gitopsing🎊
Let's follow Gimlet CLI's instructions.
Authorize Flux to fetch your GitOps repository
The gimlet gitops bootstrap command made a commit to the local copy of the GitOps repository with the Flux - the GitOps controller - deployment manifests. Let's push that now to origin main
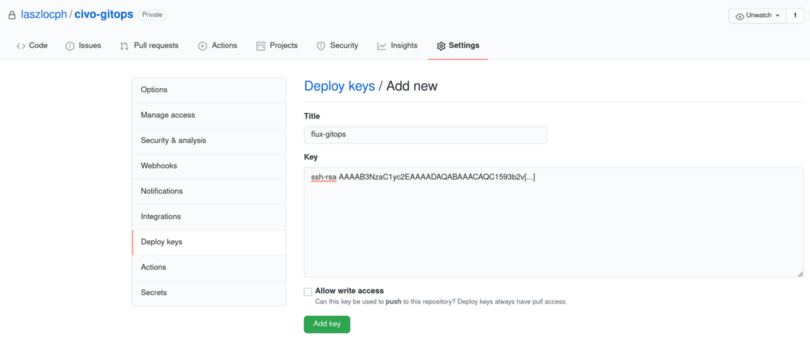
Before you apply the just written manifests on your Civo cluster, authorize Flux to fetch the contents from Github by creating a read-only deploy key in your GitOps repository.
Open GitHub, navigate to your repository, and under Settings > Deploy keys click on Add deploy key. Paste the ssh-rsa key from step 2) of the gimlet gitops bootstrap output as a key. flux-gitops can be an appropriate name for it.
Make sure to leave the Allow write access checkbox unchecked as the workflows promoted by Gimlet do not require Flux to have write access to your GitOps repository.

After all these steps, it's time to deploy Flux and start the GitOps loop.
Let's close the loop and start the GitOps deployment cycle
After granting access for Flux to read the GitOps repository, there is nothing else left to prepare. We can get to deploying Flux and inspect the GitOps deployment cycle in action.
Apply the GitOps controller manifests on the cluster from step 3) of the gimlet gitops bootstrap output. As a recap, these steps will get Flux deployed:
kubectl apply -f civo-gitops/staging/flux/flux.yaml
kubectl apply -f civo-gitops/staging/flux/deploy-key.yaml
kubectl wait --for condition=established --timeout=60s crd/gitrepositories.source.toolkit.fluxcd.io
kubectl wait --for condition=established --timeout=60s crd/kustomizations.kustomize.toolkit.fluxcd.io
kubectl apply -f civo-gitops/staging/flux/gitops-repo.yaml
Once the pods are started you can verify the GitOps deployment cycle in the Flux logs. If you have everything working, you should see Reconciliation finished messages popping up periodically.
kubectl logs -n flux-system -f deploy/source-controller

...
<{"level":"info","ts":"2021-01-19T10:07:25.368Z","logger":"controller.gitrepository","msg":"Reconciliation finished in 1.413640057s, next run in 15s","reconciler group":"source.toolkit.fluxcd.io","reconciler kind":"GitRepository","name":"gitops-repo","namespace":"flux-system"}
<{"level":"info","ts":"2021-01-19T10:07:25.368Z","logger":"controller.gitrepository","msg":"Reconciliation finished in 1.413640057s, next run in 15s","reconciler group":"source.toolkit.fluxcd.io","reconciler kind":"GitRepository","name":"gitops-repo","namespace":"flux-system"}
Congratulations, now you have a working GitOps setup!
Let the fun begin, deploy a sample application
But GitOps is only as fun as fun applications you are deploying with it.
Let's deploy now the pod tato Head sample application from CNCF.

pod tato Head is perfect to play with as it is a single file "Hello world" webservice implemented in Golang that comes with a multi-stage Docker file, raw Kubernetes manifests and a Helm chart too. So you can test out various scenarios.
Write the application manifests to GitOps
We are going to use Gimlet CLI to write the pod tato Head application manifests to GitOps. This reduces the scripting need somewhat and helps following Gimlet's GitOps conventions that unlock powerful features later on.
But first clone pod tato Head into its own directory:
$ git clone git@github.com:cncf/podtato-head.git
$ cd podtato-head
$ git checkout -b tutorial 84dcc3c6c639dbbf2c7dce02f8c2a520835ff917
then write the manifests to staging and push it:
$ gimlet gitops write -f delivery/manifest/manifest.yaml \
  --env staging \
  --app podtato-head \
  --gitops-repo-path ../civo-gitops \
  -m "My first deploy with GitOps"

$ cd ../civo-gitops && git push origin main
In 30 seconds you should see the pod tato Head application running. You can debug the deployment by looking at the Flux logs with kubectl logs -n flux-system -f deploy/source-controller
Wrapping up
By pushing our delivery manifest to our GitOps repository’s main branch, we told it to reconcile those changes on our cluster. When the controller detects changes in the main branch, it will deploy those changes, updating our app in the process.
Now you can try and deploy your own applications following the pod tato Head example.
Or, in Part Two of this tutorial you can learn how to manage a staging and production environments from your application source code.
Onwards!


