Introduction
In this learn guide you will get up and running with Serverless Functions on Civo using OpenFaaS and Kubernetes.
First you'll need to apply for access to Civo. Then we'll provision a new instance and install k3s which is a light-weight Kubernetes distribution from Rancher Labs. With a working Kubernetes master node, we'll grab the KUBECONFIG file so that we can connect from our laptop and then go on to deploy OpenFaaS and deploy a function from the store.
Once you're up and running with OpenFaaS, you can start learning how to build Serverless functions using a set of free hands-on labs built by the OpenFaaS community.
Set up an instance
The first thing we will do is create a new Civo instance and a master node by taking the following steps:
Log into your Dashboard and click Instances
Create a new instance called "openfaas-k3s"
For the size pick Medium ($20/month)
This comes with 2CPU 4GB RAM and 50GB disk. The Small ($10/month) with 2GB RAM is also workable if you want to stretch your credit out or keep your costs down.
For the Image, pick Ubuntu 18.04 LTS
Initial user: civo
Public IP Address: Create
Add your SSH Key
If you don't have one yet then click on SSH Keys in the sidebar and follow the instructions below to set up a key.
On your laptop run: ssh-keygen and accept all defaults.
Finally, you can add the key to your Civo account by inputting the value from $HOME/.ssh/id_rsa.pub to the SSH Keys page.
- Now create the instance.
Once created, note down the Public IP of the instance and export an environment variable for use later:
export IP="185.136.234.31" # for example, using the IP of your instance in the place of 185.136.234.31.
Log into the instance with ssh
Next, we will begin working on our instance. Connect to it using ssh:
$ ssh civo@$IP
We will now install k3s, which provides Kubernetes. Run the following, replacing 185.136.234.31 with the value in $IP:
curl -sLS get.k3s.io | INSTALL_K3S_EXEC='server --tls-san 185.136.234.31' sh -
Double check you used the correct IP, you should see it below:
sudo systemctl cat k3s
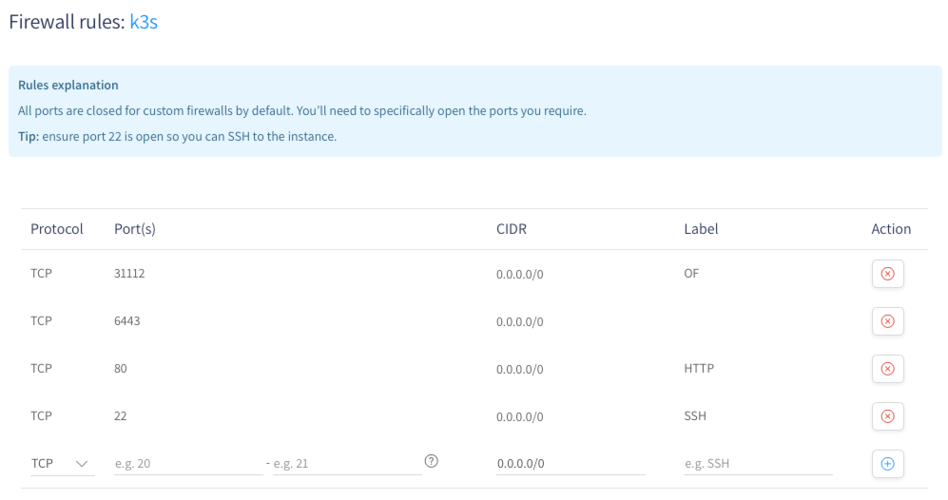
Then, secure your k3s by creating a firewall. By default k3s is insecure because it exposes the flannel networking ports.
Firewalls in Civo are whitelist-based, so create a firewall and allow the following ports on the Civo firewall page:
22(SSH)80(HTTP)443(HTTPS)6443(Kubernetes API)31112(OpenFaaS Gateway)

Get your kubeconfig for kubectl
On the instance we need to make the k3s file readable by running the following commands:
$ mkdir ~/.kube
$ sudo cp /etc/rancher/k3s/k3s.yaml ~/.kube/config
$ sudo chown civo:civo .kube/config
Now on your laptop copy it down:
$ export IP="185.136.234.31" # for example
$ mkdir -p ~/dev/workshop/ && cd ~/dev/workshop
$ scp civo@$IP:~/.kube/config .
Update the localhost reference to the remote address:
$ sed -ie s/localhost/$IP/g config`
Now see if kubectl is working:
$ export KUBECONFIG=`pwd`/config

$ kubectl get all --all-namespaces
If you open a new terminal later on, type in:
cd ~/dev/workshop # for example - your working directory for OpenFaaS
export KUBECONFIG=config
Start using OpenFaaS
Before we install OpenFaaS, you'll need to install some pre-requisites on your laptop:
Follow all of the instructions in OpenFaaS' Lab 1b, but skip the section "Setup a Kubernetes cluster".
When asked, pick: "A) For local clusters"
Your gateway address for the OpenFaaS Portal and UI will be: http://$IP:31112/ and the password is saved in gateway-password.txt
The gateway is normally passed to the CLI via the --gateway or -g flag, but you can save some time by saving an environment variable:
export OPENFAAS_URL=http://$IP:31112
Test out the OpenFaaS UI
Next, head over to OpenFaaS Lab 2 where you will test out the project and see how to deploy sample functions, including accessing the UI which you can see below.

Wrapping up
We've now set up a Civo instance, installed Kubernetes, got local access to kubectl from our laptop and have deployed OpenFaaS along with some test functions.
If you would like to continue learning you can:
- Continue the workshop at Lab 3 and learn how to deploy a dashboard for your functions
- Join the OpenFaaS Slack to chat with the OpenFaaS project community
- Read the latest OpenFaaS Blogs to find out more about functions


