Firewalls
A firewall lets you control the incoming and outgoing network traffic from your cluster or instance. The Default firewall in each region has all ports open, but we strongly recommend you customize your firewalls for security reasons.
Firewalls are specific to a region and network: If you have a firewall in network A, it can only be used by resources running in network A.
Listing firewalls
- Dashboard
- Civo CLI
On the dashboard, you can list and manage firewalls through the networking/firewalls section. In this view, you will see the firewalls by name, along with instances and clusters that are assigned to use them. By dropping down on the "Actions" button, you will be able to manage firewall rules or delete the firewall.
You can see an overview of your firewalls using civo firewall list showing you which firewalls have been configured with rules, and whether any of your instances, clusters or load balancers are using a given firewall, such as in this case where a custom firewall called "demo-firewall" has rules defined for it, but no resources using it.
$ civo firewall list
+--------------------------------------+-------------------------------------------+---------+-------------+-----------------+----------------+--------------------+
| ID                                   | Name                                      | Network | Total rules | Total Instances | Total Clusters | Total LoadBalancer |
+--------------------------------------+-------------------------------------------+---------+-------------+-----------------+----------------+--------------------+
| 16a4e13a-e228-4cba-8630-505c7cdf5ca7 | Default (all open)                        | Default |           3 |               0 |              1 |                  0 |
| aaaf9e85-31e1-4a27-b91c-1647ba95e637 | demo-firewall                             | Default |           6 |               0 |              0 |                  0 |
+--------------------------------------+-------------------------------------------+---------+-------------+-----------------+----------------+--------------------+
Creating a firewall
- Dashboard
- Civo CLI
- Terraform
Click "Create a firewall" at the top of the firewalls listing page.
Enter a name for the firewall, and choose the network it belongs to. You can either choose the Default network or one of the networks created over in the network section. (Read more about networks).

Once the firewall is created, you can customise the inbound and outbound traffic rules. You can do so by dropping down the "Actions" menu and selecting "Rules":

This will allow you to specify a single port, or a port range, the protocol, direction and whether the rule is to allow or deny traffic:

Resources that are created or already running in the same network as the firewall can then be configured to use that firewall to control network traffic.
To create a new Firewall, use the command civo firewall create new_firewall_name:
$ civo firewall create civocli_demo
Created a firewall called civocli_demo with ID ab2a25d7-edd4-4ecd-95c4-58cb6bc402de
Once the firewall is created, you can customise the inbound and outbound traffic rules. You can do so by adding a new rule using civo firewall rule create firewall_id with the required and your choice of optional parameters, listed here and used in an example below:
  -a, --action string      the action of the rule can be allow or deny (default is allow) (default "allow")
  -c, --cidr string        the CIDR of the rule you can use (e.g. -c 10.10.10.1/32,148.2.6.120/32) (default "0.0.0.0/0")
  -d, --direction string   the direction of the rule can be ingress or egress (default is ingress) (default "ingress")
  -e, --endport string     the end port of the rule
  -l, --label string       a string that will be the displayed as the name/reference for this rule
  -p, --protocol string    the protocol choice (TCP, UDP, ICMP) (default "TCP")
  -s, --startport string   the start port of the rule
For example:
$ civo firewall rule create cli-demo --startport=22 --direction=ingress --label='SSH access' --action="allow"
Created a firewall rule called SSH access to allow, ingress access to port 22 from 0.0.0.0/0 with ID 15ce86b9-e269-4f0d-a83c-10e49fbf9eba
1. Add a region to the provider
Since the region field is optional in most of Civo Terraform provider's resources and data sources (if no region is provided in the configuration or provider.tf file, the system will choose one for you), it's a good idea to just declare it once at the provider level.
The benefits of declaring region at provider level are:
- We don't have to repeat it all over the place in our configuration file(s)
- Terraform will ensure all API calls for data sources and resources communicate with a consistent region
To do so, simply update your provider.tf to include a region field. Example:
// code omitted for brevity

provider "civo" {
  token = "<YOUR_CIVO_API_KEY>"
    region = "LON1"
}
2. Prepare a configuration file
Create a file named main.tf and insert the following:
# Query small instance size
data "civo_size" "small" {
    filter {
        key = "name"
        values = ["g3.small"]
        match_by = "re"
    }

    filter {
        key = "type"
        values = ["instance"]
    }

}

# Query instance disk image
data "civo_disk_image" "debian" {
   filter {
        key = "name"
        values = ["debian-10"]
   }
}

# Create a firewall
resource "civo_firewall" "www" {
    name = "www"
}

# Create a firewall rule
resource "civo_firewall_rule" "kubernetes" {
    firewall_id = civo_firewall.www.id
    protocol = "tcp"
    start_port = "6443"
    end_port = "6443"
    cidr = ["0.0.0.0/0"]
    direction = "ingress"
    label = "kubernetes-api-server"
    action = "allow"
}

# Create a compute instance
resource "civo_instance" "foo" {
    hostname = "foo.com"
    firewall_id = civo_firewall.www.id
    size = element(data.civo_size.small.sizes, 0).name
    disk_image = element(data.civo_disk_image.debian.diskimages, 0).id
}
The configuration includes the following:
-
The
Query small instance sizeandQuery instance disk imageblocks, we are querying for a list of instance sizes and disk images to be used when creating a Civo compute instance later. For more detail about these blocks, see the Terraform documentation on creating instances. -
In the
Create a firewallblock:- A new firewall is declared using the
civo_firewallresource and:- The firewall name is set to
www. - This firewall can then be referred to as
civo_firewall.www. For example, if we need to use this firewall'sidlater, the syntax will becivo_firewall.www.id.
- The firewall name is set to
- A new firewall is declared using the
-
In the
Create a firewall ruleblock:- a new firewall rule is declared using the civo_firewall_rule resource and:
- It is linked to the
wwwfirewall above. - The protocol is set to
tcp. - Both the start and end port of the rule are set to
6443(a common port for HTTP). - CIDR notation is set to
0.0.0.0/0to open the6443port to everyone. - The direction is set to
ingressso this rule will be effective for incoming traffic (from the outside world to our compute instance). - The label is set to
web-serverfor our reference. - This firewall rule can be later referred to as as
civo_firewall_rule.httplater, if desired. - The action is set to
allow, this is going to add a rule to allow traffic Conversely, setting the action todenywill deny the traffic to the specified port(s).
- It is linked to the
- a new firewall rule is declared using the civo_firewall_rule resource and:
-
The
Create a compute instanceblock is similar to the one created in the instance creation documentation, with the addition of afirewall_idline, which is pointed tocivo_firewall.www.id. This means that when the compute instance described in the block is created, it will not use thedefaultfirewall. Instead, it will use the firewall created in the configuration above.
For the full list of fields supported by civo_firewall and civo_firewall_rule resources, see the Terraform provider documentation.
3. Plan
With the above configuration saved, you can run terraform plan to see the resources to be created:
$ terraform plan
Terraform used the selected providers to generate the following execution plan. Resource actions are indicated with the following symbols:
+ create
Terraform will perform the following actions:
# civo_firewall.www will be created
+ resource "civo_firewall" "www" {
+ id = (known after apply)
+ name = "www"
+ network_id = (known after apply)
}
# civo_firewall_rule.http will be created
+ resource "civo_firewall_rule" "http" {
+ cidr = [
+ "0.0.0.0/0",
]
+ direction = "ingress"
+ end_port = "6443"
+ firewall_id = (known after apply)
+ id = (known after apply)
+ label = "web-server"
+ protocol = "tcp"
+ region = (known after apply)
+ start_port = "6443"
}
# civo_instance.foo will be created
+ resource "civo_instance" "foo" {
+ cpu_cores = (known after apply)
+ created_at = (known after apply)
+ disk_gb = (known after apply)
+ disk_image = "4204229c-510c-4ba4-ab07-522e2aaa2cf8"
+ firewall_id = (known after apply)
+ hostname = "foo.com"
+ id = (known after apply)
+ initial_password = (sensitive value)
+ initial_user = "civo"
+ network_id = (known after apply)
+ private_ip = (known after apply)
+ pseudo_ip = (known after apply)
+ public_ip = (known after apply)
+ public_ip_required = "create"
+ ram_mb = (known after apply)
+ size = "g3.small"
+ source_id = (known after apply)
+ source_type = (known after apply)
+ status = (known after apply)
+ template = (known after apply)
}
Plan: 3 to add, 0 to change, 0 to destroy.
───────────────────────────────────────────────────────────────────────────────────────────────────────────────�───────────────────────────────────────────────────────────────────────────────────────────
Note: You didn't use the -out option to save this plan, so Terraform can't guarantee to take exactly these actions if you run "terraform apply" now.
As you can see from the output above, what will happen later when the configuration file is applied is:
- Terraform will create a firewall named
www - Inside that
wwwfirewall, it will create a firewall rule to open port6443to outside world - Then, a new compute instance will be created, and its firewall set to the new
wwwfirewall
4. Apply the configuration
To apply the configuration and allow Terraform to create the resources, run terraform apply and type yes when asked for confirmation:
$ terraform apply
Terraform used the selected providers to generate the following execution plan. Resource actions are indicated with the following symbols:
  + create

Terraform will perform the following actions:

  # civo_firewall.www will be created
  + resource "civo_firewall" "www" {
      + id         = (known after apply)
      + name       = "www"
      + network_id = (known after apply)
    }

  # civo_firewall_rule.http will be created
  + resource "civo_firewall_rule" "http" {
      + cidr        = [
          + "0.0.0.0/0",
        ]
      + direction   = "ingress"
      + end_port    = "6443"
      + firewall_id = (known after apply)
      + id          = (known after apply)
      + label       = "web-server"
      + protocol    = "tcp"
      + region      = (known after apply)
      + start_port  = "6443"
    }

  # civo_instance.foo will be created
  + resource "civo_instance" "foo" {
      + cpu_cores          = (known after apply)
      + created_at         = (known after apply)
      + disk_gb            = (known after apply)
      + disk_image         = "a4204155-a876-43fa-b4d6-ea2af8774560"
      + firewall_id        = (known after apply)
      + hostname           = "foo.com"
      + id                 = (known after apply)
      + initial_password   = (sensitive value)
      + initial_user       = "civo"
      + network_id         = (known after apply)
      + private_ip         = (known after apply)
      + pseudo_ip          = (known after apply)
      + public_ip          = (known after apply)
      + public_ip_required = "create"
      + ram_mb             = (known after apply)
      + size               = "g3.small"
      + source_id          = (known after apply)
      + source_type        = (known after apply)
      + status             = (known after apply)
      + template           = (known after apply)
    }

Plan: 3 to add, 0 to change, 0 to destroy.

Do you want to perform these actions?
  Terraform will perform the actions described above.
  Only 'yes' will be accepted to approve.

  Enter a value: yes

civo_firewall.www: Creating...
civo_firewall.www: Creation complete after 3s [id=d58c8430-c4ee-469b-a390-0c8cd446de5e]
civo_firewall_rule.http: Creating...
civo_instance.foo: Creating...
civo_firewall_rule.http: Creation complete after 2s [id=922679f3-2044-44e9-af9d-d7a0866e076d]
civo_instance.foo: Still creating... [10s elapsed]
civo_instance.foo: Still creating... [20s elapsed]
civo_instance.foo: Still creating... [30s elapsed]
civo_instance.foo: Still creating... [40s elapsed]
civo_instance.foo: Still creating... [50s elapsed]
civo_instance.foo: Creation complete after 55s [id=e1bad596-be02-4ad4-b07a-108ed4b8f57e]

Apply complete! Resources: 3 added, 0 changed, 0 destroyed.
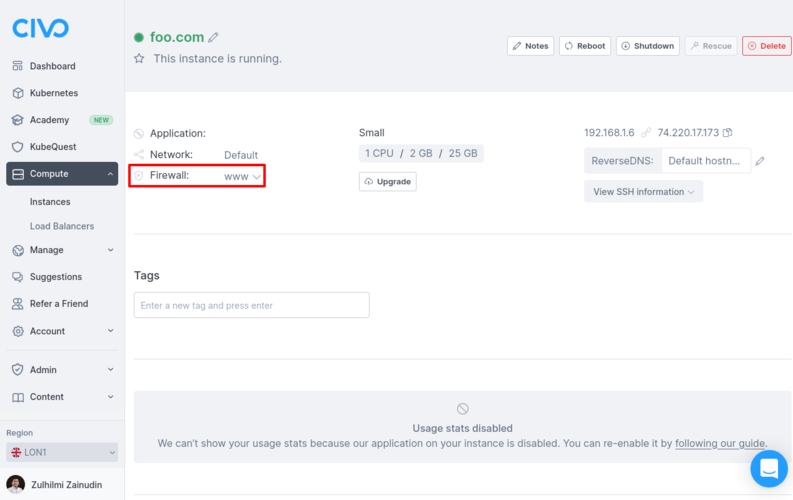
When the creation completes, refresh your Civo web dashboard. You should see the new compute instance on the instances page. Click it to see more details.
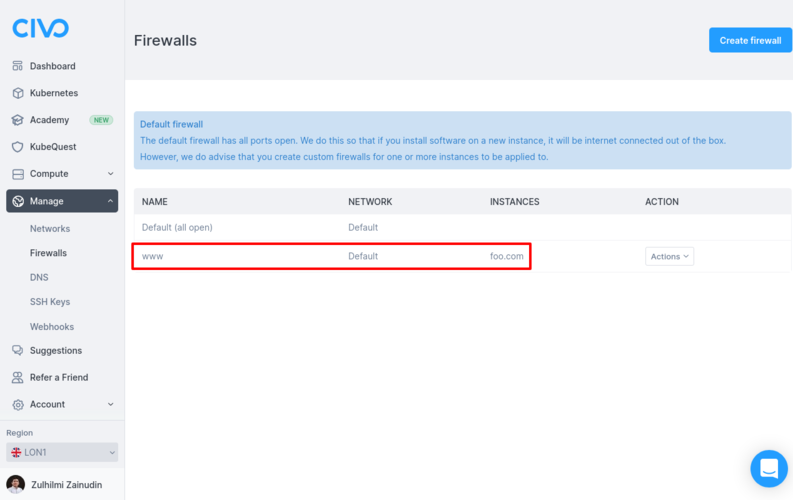
Correspondingly, on the Firewalls page for that region, the new firewall will be visible:
If you notice, there will be a new file named terraform.tfstate in your local project directory after applying the configuration. Its contents will be along the lines of the following:
{
  "version": 4,
  "terraform_version": "1.0.6",
  "serial": 5,
  "lineage": "9846ee7a-c5b2-cf16-a705-3f57ffc38fc9",
  "outputs": {},
  "resources": [
    {
      "mode": "data",
      "type": "civo_disk_image",
      "name": "debian",
      "provider": "provider[\"registry.terraform.io/civo/civo\"]",
      "instances": [
        {
          "schema_version": 0,
          "attributes": {
            "diskimages": [
              {
                "id": "a4204155-a876-43fa-b4d6-ea2af8774560",
                "label": "",
                "name": "debian-10",
                "version": "10"
              }
            ],
            "filter": [
              {
                "all": false,
                "key": "name",
                "match_by": "exact",
                "values": [
                  "debian-10"
                ]
              }
            ],
            "id": "terraform-20210920044137658700000002",
            "region": null,
            "sort": null
          },
          "sensitive_attributes": []
        }
      ]
    },
    {
      "mode": "data",
      "type": "civo_instances_size",
      "name": "small",
      "provider": "provider[\"registry.terraform.io/civo/civo\"]",
      "instances": [
        {
          "schema_version": 0,
          "attributes": {
            "filter": [
              {
                "all": false,
                "key": "name",
                "match_by": "re",
                "values": [
                  "g3.small"
                ]
              },
              {
                "all": false,
                "key": "type",
                "match_by": "exact",
                "values": [
                  "instance"
                ]
              }
            ],
            "id": "terraform-20210920044137612100000001",
            "sizes": [
              {
                "cpu": 1,
                "description": "Small",
                "disk": 25,
                "name": "g3.small",
                "ram": 2048,
                "selectable": true,
                "type": "instance"
              }
            ],
            "sort": null
          },
          "sensitive_attributes": []
        }
      ]
    },
    {
      "mode": "managed",
      "type": "civo_firewall",
      "name": "www",
      "provider": "provider[\"registry.terraform.io/civo/civo\"]",
      "instances": [
        {
          "schema_version": 0,
          "attributes": {
            "id": "d58c8430-c4ee-469b-a390-0c8cd446de5e",
            "name": "www",
            "network_id": "5c16ab17-933a-46ed-96c6-8a093a0179e1",
            "region": null
          },
          "sensitive_attributes": [],
          "private": "bnVsbA=="
        }
      ]
    },
    {
      "mode": "managed",
      "type": "civo_firewall_rule",
      "name": "http",
      "provider": "provider[\"registry.terraform.io/civo/civo\"]",
      "instances": [
        {
          "schema_version": 0,
          "attributes": {
            "cidr": [
              "0.0.0.0/0"
            ],
            "direction": "ingress",
            "end_port": "6443",
            "firewall_id": "d58c8430-c4ee-469b-a390-0c8cd446de5e",
            "id": "922679f3-2044-44e9-af9d-d7a0866e076d",
            "label": "web-server",
            "protocol": "tcp",
            "region": null,
            "start_port": "6443"
          },
          "sensitive_attributes": [],
          "private": "bnVsbA==",
          "dependencies": [
            "civo_firewall.www"
          ]
        }
      ]
    },
    {
      "mode": "managed",
      "type": "civo_instance",
      "name": "foo",
      "provider": "provider[\"registry.terraform.io/civo/civo\"]",
      "instances": [
        {
          "schema_version": 0,
          "attributes": {
            "cpu_cores": 1,
            "created_at": "0001-01-01 00:00:00 +0000 UTC",
            "disk_gb": 25,
            "disk_image": "a4204155-a876-43fa-b4d6-ea2af8774560",
            "firewall_id": "d58c8430-c4ee-469b-a390-0c8cd446de5e",
            "hostname": "foo.com",
            "id": "e1bad596-be02-4ad4-b07a-108ed4b8f57e",
            "initial_password": "1eRj0Bn5w7uP",
            "initial_user": "civo",
            "network_id": "5c16ab17-933a-46ed-96c6-8a093a0179e1",
            "notes": "",
            "private_ip": "192.168.1.6",
            "pseudo_ip": null,
            "public_ip": "74.220.17.173",
            "public_ip_required": "create",
            "ram_mb": 2048,
            "region": null,
            "reverse_dns": "",
            "script": "",
            "size": "g3.small",
            "source_id": "debian-10",
            "source_type": "diskimage",
            "sshkey_id": "",
            "status": "ACTIVE",
            "tags": null,
            "template": null
          },
          "sensitive_attributes": [],
          "private": "bnVsbA==",
          "dependencies": [
            "civo_firewall.www",
            "data.civo_disk_image.debian",
            "data.civo_instances_size.small"
          ]
        }
      ]
    }
  ]
}
This is the Terraform State File which is created when the configuration is applied.
If you update your main.tf file and run terraform apply again, Terraform will refresh the state file, try to understand what you want to update and update your defined resources accordingly.
If there's no change in your main.tf file and you rerun terraform apply, it will output a No changes. Your infrastructure matches the configuration message back to you.
Deleting a firewall
You cannot delete a firewall if an instance, cluster or other type of resource is using it. Change the firewall of such resources to be able to delete a firewall.
- Dashboard
- Civo CLI
On the web, you can delete a firewall from the firewalls listing page, using the Actions menu on the row of the firewall you want to delete.
The system will prompt you to confirm the name of the firewall to delete. When you confirm the firewall name, the system will proceed to delete it immediately.
Delete a firewall using the CLI by running civo firewall remove firewall_name or civo firewall remove firewall_id:
$ civo firewall remove cli-demo
Warning: Are you sure you want to delete the cli-demo firewall (y/N) ? y
The firewall (cli-demo) has been deleted
For scripting use, you can add a -y flag to Civo CLI commands which usually require confirmation. This will assume you will answer "yes" to any prompt.