Configuring Block Storage on Civo
Block storage allows you to create and attach additional storage volumes to your instances. These volumes are a totally independent resource that can be moved from one instance to another. Attached block storage will work like locally connected storage drives, which means managing your storage is easy and you can use familiar tools to do so.
In this learn guide, we will cover the following subjects:
- What is Block Storage?
- What are the common ways to use Block Storage?
- How to create and attach volumes to your Instances
- How to partition and format volumes
- How to resize volumes
- How to detach and delete volumes
What is Block Storage?
Block Storage is a convenient and flexible way of managing additional storage for your instances. Block Storage is configured in units known as volumes. Volumes function as block devices, this means they appear to the operating system as locally attached storage drives which can be partitioned and formatted to your individual needs ( handy right?! ).
A couple of points you should know about Block Storage:
- All Block Storage volumes are backed by SSD's
- Volumes are region specific resources. You are able to move your volumes between any instance in the same region
- A volume can only be attached to a single instance at any one time
When And Why Should I Use Block Storage?
Good question! Block Storage is a fantastic solution for when you need that little ( or much ) more storage space, but you do not need or require the additional processing power or memory that a larger Civo instance can provide. The volumes can be created, destroyed and expanded easily as your needs for them change. You can start small and grow as you require which means you only use the storage space you need, rather than having a big chunk you're not using but still paying for.
Volumes are great because they function as generic block devices, they can be very useful in a number of different ways. A few examples of this are:
- To store database files for a database server such as MySQL, PostgreSQL and others
- As a target device for backups
- As the media uploads directory for a web server
Block Storage is not a specialised resource, which sounds bad but that's what makes it so versatile. It can be used for just about anything that will benefit from additional disk space, which in our books is only a good thing!
How to Create and Attach New Volumes
Creating a new volume is nice and easy through the Civo control panel. You can create a volume by clicking on the Volumes section your dashboard and then select Create Volume :
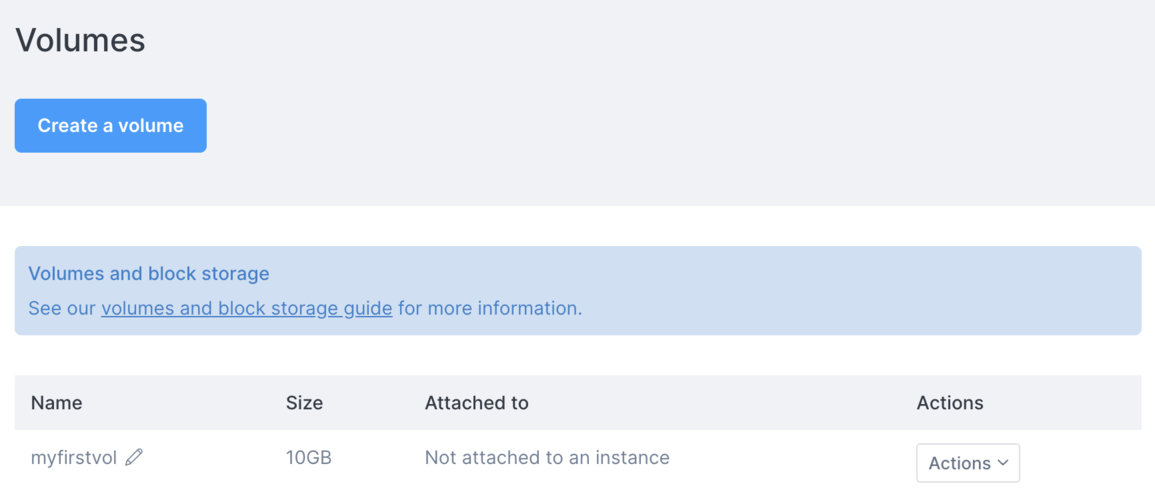
Once done, it will take you to the next section where you can decide what size you want your volume to be and to give it a name of your choice. Once you have selected a name and size of your volume , simply click on the Create button to setup your first volume:

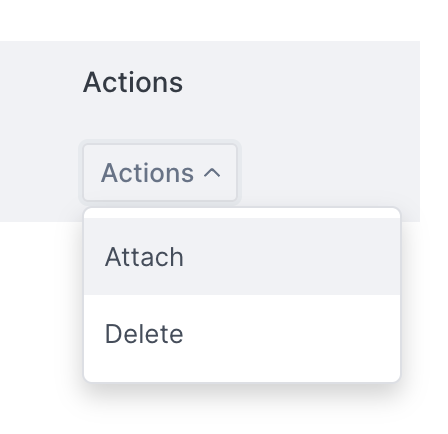
We now have the volume created and we can attach it to any instance of your choice. To do this simply click on the Actions menu to the right of your volume name, followed by the Attach menu item, then select the instance from the drop down menu provided:
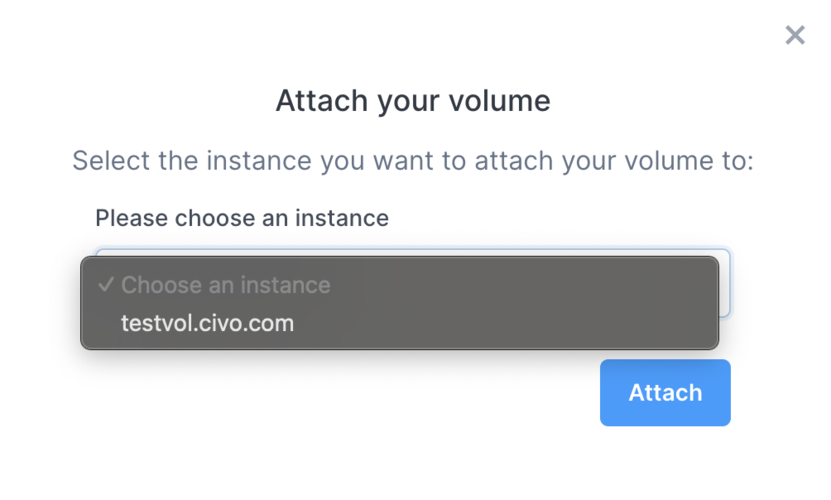
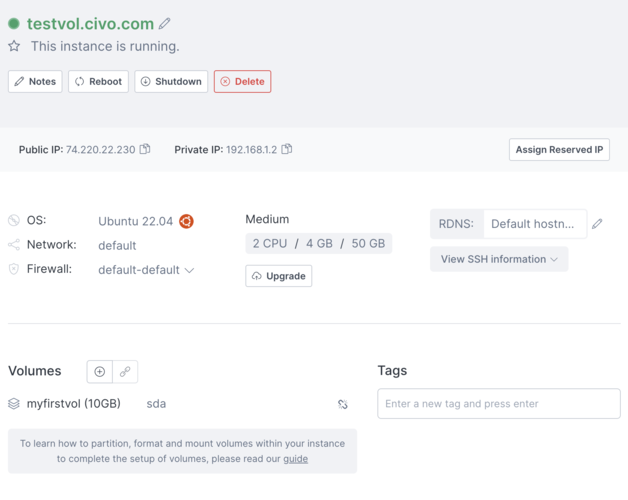
Click Attach and you will now have your volume attached to your instance:

You can also see how it looks from your instance page as well:
Getting the Volume ready for Use in Linux
Once you attach a volume to your instance, it will need to be prepared for use as you would for any new disk added to a Linux operating system. The steps required by this will depend on whether you are attaching a newly created volume or setting up and existing volume on a new instance. So we will cover both to make sure no mistakes are made.
Preparing a Newly Created Volume
Once you have created a new volume, it will require some preparation before your instance can begin to utilise the space. A volume must be partitioned, formatted with a filesystem and then finally mounted. We would also recommend that you modify the /etc/fstab so that the volume will automatically mount at boot.
This process can be modified significantly depending on your individual needs and it may also vary depending on the Linux distribution, the procedure we are using can be used to get up and running quickly in most user cases. The following commands below will:
- Create a single GPT partition ( using parted ) that will span the entire volume
- Format the partition with the Ext4 filesystem
- Create a mount point under the
/mntdirectory - Mount the filesystem
- Adjust the
/etc/fstabto define a persistent mount
Before running the commands, make sure you are logged in with a user that as sudo privileges or you are the root user.
First we need to get back the volume ID. To do this, simply click on the Volumes link on your Civo dashboard which will display the ID of the volume for you:

As we can see the ID is /dev/sda.
You can also see this when logged in to your instance (as root) with the fdisk -l command:
root@testvol-civo-com-0e42-c21121:~# fdisk -l
Disk /dev/sda: 9.45 GiB, 10146860544 bytes, 19818087 sectors
Disk model: QEMU HARDDISK
Units: sectors of 1 * 512 = 512 bytes
Sector size (logical/physical): 512 bytes / 512 bytes
I/O size (minimum/optimal): 512 bytes / 512 bytes
NOTE: you will see a number of other disks listed when using the
fdisk -lcommand, including/dev/loop0,/dev/loop1, and/dev/loop2
Next we need to use parted to create a GPT partition. First we need to enter the disk we want to make the partiton on:
root@testvol-civo-com-0e42-c21121:~# sudo parted /dev/sda
GNU Parted 3.4
Using /dev/sda
Welcome to GNU Parted! Type 'help' to view a list of commands.
(parted)
Next we need to print the disk to make sure we are using the right one:
(parted) print
Error: /dev/sda: unrecognised disk label
Model: QEMU QEMU HARDDISK (scsi)
Disk /dev/sda: 10.1GB
Sector size (logical/physical): 512B/512B
Partition Table: unknown
Disk Flags:
We now need to give the disk a GPT label name using the mklabel command:
(parted) sudo mklabel gpt
(parted)
Now we have created the label for the disk, we need to use the mkpart command to create a primary partition.:
(parted) mkpart
Partition name?  []? testvol
File system type?  [ext2]? ext4
Start? 1
End? 10000
**Note, the start and end units are in megabytes and as we are using a 10GB partition it will start from 1 and end at 10000 **
Now that is done we can quit the parted manager and format our new partition in the ext4 file system using the mkfs command:
(parted) quit
Information: You may need to update /etc/fstab.
root@testvol-civo-com-0e42-c21121:~# mkfs.ext4 /dev/sda
mke2fs 1.46.5 (30-Dec-2021)
Found a gpt partition table in /dev/sda
Proceed anyway? (y,N) y
Discarding device blocks: done
Creating filesystem with 2477260 4k blocks and 620160 inodes
Filesystem UUID: 037acf2e-e31a-4112-bedc-b800bd7bf7e2
Superblock backups stored on blocks:
	32768, 98304, 163840, 229376, 294912, 819200, 884736, 1605632

Allocating group tables: done
Writing inode tables: done
Creating journal (16384 blocks): done
Writing superblocks and filesystem accounting information: done
Now we have created the filesystem, we can use the parted command again to check it has worked and it has been formatted with the ex4 filesystem:
root@testvol-civo-com-0e42-c21121:~# sudo parted /dev/sda
GNU Parted 3.4
Using /dev/sda
Welcome to GNU Parted! Type 'help' to view a list of commands.
(parted) print
Model: QEMU QEMU HARDDISK (scsi)
Disk /dev/sda: 10.1GB
Sector size (logical/physical): 512B/512B
Partition Table: loop
Disk Flags:

Number  Start  End     Size    File system  Flags
 1      0.00B  10.1GB  10.1GB  ext4
Excellent! As we can see we have the correct size and the right filesystem type. We can now exit parted and make a folder to mount our volume:
(parted) quit

root@testvol-civo-com-0e42-c21121:~# sudo mkdir /mnt/myfirstvol
root@testvol-civo-com-0e42-c21121:~# sudo mount /dev/sda1 /mnt/myfirstvol
Testing the Mounted Filesystem
We should now have a mounted filesystem and we can test that it was successful by using the following command:
root@testvol-civo-com-0e42-c21121:~# findmnt /mnt/myfirstvol
You should get a similar output as below:
TARGET          SOURCE    FSTYPE OPTIONS
/mnt/myfirstvol /dev/sda1 ext4   rw,relatime
Adjust /etc/fstab to define a persistent mount
Now we have a mounted filesystem we want to ensure it remains persistent during reboots of your instance. To do this we need to edit the /etc/fstab and pass it some options to ensure the volume comes up on boot:
sudo vim /etc/fstab
The /etc/fstab file should look similar to the following:
LABEL=cloudimg-rootfs   /        ext4   discard,errors=remount-ro       0 1
LABEL=UEFI      /boot/efi       vfat    umask=0077      0 1
We can now add our volume so it is also mounted using the default values for the ext4 filesystem:
/dev/sda1 /mnt/myfirstvol ext4 defaults 0 0
Once you have added the values, save and exit your editor. Hurray! Your volume will now automatically come up at boot time so you don't have to worry about mounting the filesystem manually every time you reboot your instance.
How to resize a volume
Resizing a volume can be done in a few easy steps and it will allow you to grow your volume easily as and when you require it. The steps we need to take are:
- Increase the volume size through the Civo dashboard.
- Login to your instance and make sure the volume isn't being written to by unmounting it.
- Adjust the partition table if the volume is partitioned
- Expand the filesystem on the instance
- Remount the volume on your instance
Login to your instance and make sure the volume isn't being written to by unmounting it
Now we need to login to our instance and unmount the volume using the umount command:
root@testvol-civo-com-0e42-c21121:~# umount /mnt/myfirstvol
Adjust the partition table if the volume is partitioned
Now we have unmounted the volume, we can now resize the partiton table using the growpart command:
root@testvol-civo-com-0e42-c21121:~# growpart /dev/sda 1
CHANGED: partition=1 start=2048 old: size=20895744 end=20897792 new: size=41940959,end=41943007
Now we have grown the partiton table and we are using the Ext4 filesystem, we can run a quick check on the partition using the e2fsck command and then run resize2fs:
root@testvol-civo-com-0e42-c21121:~# e2fsck -f /dev/sda1
e2fsck 1.42.13 (17-May-2015)
Pass 1: Checking inodes, blocks, and sizes
Pass 2: Checking directory structure
Pass 3: Checking directory connectivity
Pass 4: Checking reference counts
Pass 5: Checking group summary information
/dev/sda1: 11/654080 files (0.0% non-contiguous), 79565/2611968 blocks
root@testvol-civo-com-0e42-c21121:~# resize2fs /dev/sda1
resize2fs 1.42.13 (17-May-2015)
Resizing the filesystem on /dev/vdb1 to 5242619 (4k) blocks.
The filesystem on /dev/sda1 is now 5242619 (4k) blocks long.
Remount the volume on your instance
Almost there! Now we have successfully increased the filesystem, we simply need to remount your volume again and check the size:
root@testvol-civo-com-0e42-c21121:~# mount /dev/sda1 /mnt/myfirstvol/
root@testvol-civo-com-0e42-c21121:~# lsblk
NAME    MAJ:MIN RM  SIZE RO TYPE MOUNTPOINTS
loop0     7:0    0   87M  1 loop /snap/lxd/28373
loop1     7:1    0 63.9M  1 loop /snap/core20/2264
loop2     7:2    0 38.7M  1 loop /snap/snapd/21465
sda       8:0    0 19.5G  0 disk
vda     252:0    0 47.3G  0 disk
├─vda1  252:1    0 47.1G  0 part /
├─vda14 252:14   0    4M  0 part
└─vda15 252:15   0  106M  0 part /boot/efi
vdb     252:16   0    1M  0 disk
Excellent! We have now successfully increased the volume size to 20G.
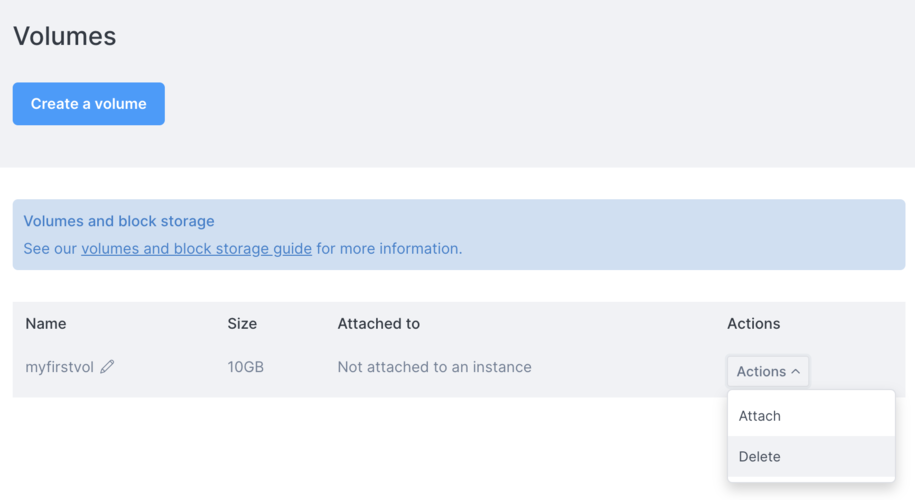
How to detach and delete a volume
If you wish to remove your volume from your instance and fully delete it, this can be done in a few small steps which are:
- Unmount the volume from your instance
- Remove the path from the fstab on your instance
- Delete the volume from the Civo dashboard
Unmount the volume from your instance
Before you unmount your volume it is good practice to make sure nothing is still being written to it ( As the volume will not unmount ). SSH into your instance and once you are happy nothing is using the volume we can unmount it by using the umount command. First we need to get the mount point back for your volume which you can do a number of ways. In this example we will us lsblk
root@testvol-civo-com-0e42-c21121:~# lsblk
NAME    MAJ:MIN RM  SIZE RO TYPE MOUNTPOINTS
loop0     7:0    0   87M  1 loop /snap/lxd/28373
loop1     7:1    0 63.9M  1 loop /snap/core20/2264
loop2     7:2    0 38.7M  1 loop /snap/snapd/21465
vda     252:0    0 47.3G  0 disk
├─vda1  252:1    0 47.1G  0 part /
├─vda14 252:14   0    4M  0 part
└─vda15 252:15   0  106M  0 part /boot/efi
vdb     252:16   0    1M  0 disk
Now we have the mount point /mnt/myfirstvol we can unmount it using the umount command:
root@testvol-civo-com-0e42-c21121:~# umount /mnt/myfirstvol
The mount point will now be unmounted and we can check again with lsblk
root@testvol-civo-com-0e42-c21121:~# lsblk
NAME    MAJ:MIN RM  SIZE RO TYPE MOUNTPOINTS
loop0     7:0    0   87M  1 loop /snap/lxd/28373
loop1     7:1    0 63.9M  1 loop /snap/core20/2264
loop2     7:2    0 38.7M  1 loop /snap/snapd/21465
vda     252:0    0 47.3G  0 disk
├─vda1  252:1    0 47.1G  0 part /
├─vda14 252:14   0    4M  0 part
└─vda15 252:15   0  106M  0 part /boot/efi
vdb     252:16   0    1M  0 disk
Success! As we can see there is no longer a mount point attached to the /dev/sda1 disk.
Remove the path from the fstab on your instance
Now we have unmounted the volume we can remove it from the fstab to ensure that your instance doesn't try to bring up the volume on boot. To do this we just need to remove the entry from /etc/fstab using your favourite editor:
root@testvol-civo-com-0e42-c21121:~# vim /etc/fstab

LABEL=cloudimg-rootfs   /        ext4   discard,errors=remount-ro       0 1
LABEL=UEFI      /boot/efi       vfat    umask=0077      0 1

/dev/sda1        /mnt/myfirstvol ext4   defaults        0 0
Ensure that when removing any entry from the fstab, you only remove any mount points that have been added in manually. If you were to remove the default mount point, your instance would not boot up after a reboot.
Delete the volume from the Civo dashboard
Now we have done all of the steps on the instance, the final step is to delete the volume from the Civo dashboard. Simply click on the volumes link and then select the Actions menu, followed by delete. Delete the volume by entering the name of the volume followed by clicking on the Delete button.
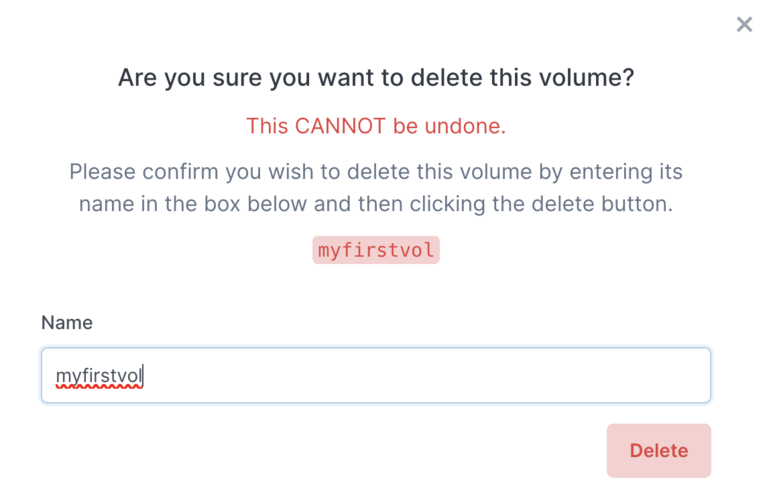
Excellent! The volume has now been deleted.