Managing a Kubernetes cluster's node pools
Overview
You can group a cluster's worker nodes into node pools. The nodes in each pool are all of the same size, so if you want a cluster to have nodes of different instance sizes, you must create a new pool for each size.
When creating nodes for GPU workloads, you will need to select the "GPU Optimized" Tab when selecting the size of the node.
Worker Node Allocatable Resources
Civo Kubernetes uses an intelligent resource allocation system to determine how much CPU and memory are available for your workloads on each worker node. This system reserves resources for essential system processes while maximizing the resources available for your applications.
How Resource Allocation Works
When you create worker nodes, not all of the node's CPU and memory are available for your pods. The system reserves resources for:
- System daemons: Essential Kubernetes components like kubelet, container runtime, and system processes
- Pod eviction: Buffer space to handle pod evictions gracefully
- Kernel and OS: Operating system overhead
Memory Reservation Algorithm
Civo Kubernetes uses different memory reservation strategies depending on the node's total RAM.
Small nodes (RAM ≤ 2 GiB)
For nodes with 2 GiB or less of RAM (Extra Small and Small Standard sizes), the system uses fixed reservation values optimized to leave enough allocatable memory for workloads:
| Component | Extra Small (1 GiB) | Small (2 GiB) |
|---|---|---|
| kube-reserved (memory) | 256 MiB | 512 MiB |
| system-reserved (memory) | 100 MiB | 100 MiB |
| eviction-hard (memory threshold) | 75 MiB | 100 MiB |
| Total reserved | 431 MiB (47%) | 712 MiB (35%) |
| Allocatable | ~487 MiB (53%) | ~1336 MiB (65%) |
These fixed values were introduced to prevent memory pressure on small nodes. With the standard progressive algorithm, an Extra Small node would have 71% of its memory reserved, leaving insufficient room for even basic system pods to schedule.
Standard nodes (RAM > 2 GiB)
For nodes with more than 2 GiB of RAM, the kube-reserved memory is calculated using a progressive, tiered approach that scales with the total memory of the node:
| Memory Range | Reservation Rate |
|---|---|
| First 4 GiB | 25% of memory in this range |
| Next 4 GiB (4-8 GiB total) | 20% of memory in this range |
| Next 8 GiB (8-16 GiB total) | 10% of memory in this range |
| Next 112 GiB (16-128 GiB total) | 6% of memory in this range |
| Above 128 GiB | 2% of memory in this range |
In addition to the calculated kube-reserved value, the following fixed reservations apply to standard nodes:
| Component | Value |
|---|---|
| kube-reserved (additional buffer) | +100 MiB added to the calculated value |
| system-reserved (memory) | 200 MiB |
| eviction-hard (memory threshold) | 100 MiB |
Allocatable Resources by Node Size
The following table shows the actual reserved and allocatable memory for each Standard (g4s.kube.*) node size:
| Size | RAM | kube-reserved | system-reserved | eviction-hard | Total Reserved | Allocatable | Reserved % |
|---|---|---|---|---|---|---|---|
| Extra Small | 1 GiB | 256 MiB | 100 MiB | 75 MiB | 431 MiB | ~487 MiB | 47% |
| Small | 2 GiB | 512 MiB | 100 MiB | 100 MiB | 712 MiB | ~1336 MiB | 35% |
| Medium | 4 GiB | 1124 MiB | 200 MiB | 100 MiB | 1424 MiB | ~2672 MiB | 35% |
| Large | 8 GiB | 1943 MiB | 200 MiB | 100 MiB | 2243 MiB | ~5949 MiB | 27% |
Performance (g4p.kube.*), CPU Optimized (g4c.kube.*), and RAM Optimized (g4m.kube.*) node types use the same reservation algorithm. Larger nodes have higher allocation efficiency — for example, a 128 GiB node reserves only about 8% of its memory.
CPU Reservation Algorithm
CPU reservations follow a progressive model across all node sizes:
| CPU Cores | Reservation Rate |
|---|---|
| First core | 6% of the core |
| Second core | 1% of the core |
| Next 2 cores (cores 3-4) | 0.5% per core |
| Above 4 cores | 0.25% per core |
Benefits of This Approach
- Predictable Performance: Ensures system stability by reserving adequate resources for essential processes
- Optimized for All Sizes: Small nodes use fixed reservations tuned to avoid memory pressure, while larger nodes benefit from progressive scaling for higher allocation efficiency
- Industry Best Practices: Uses proven resource allocation methodologies for optimal cluster performance
- Workload Protection: Reserved buffer prevents resource starvation of critical system components
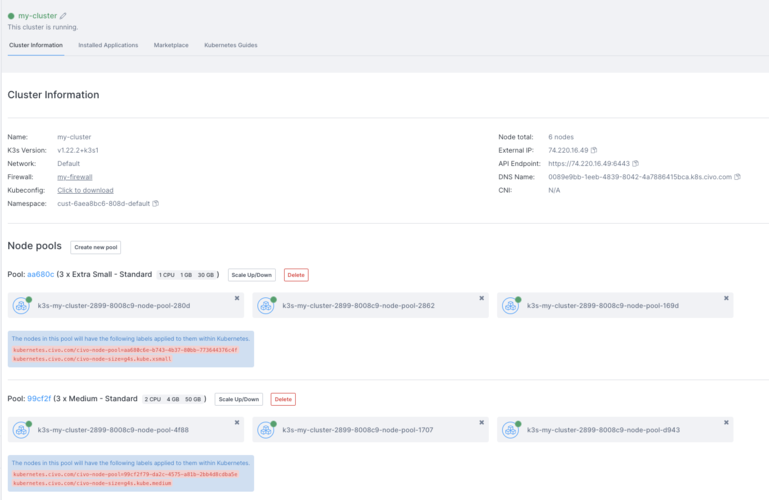
Adding a new node pool
- Dashboard
- Civo CLI
- Terraform
You can add a new node pool to a running cluster by clicking on "Create new pool" on your cluster's information page.
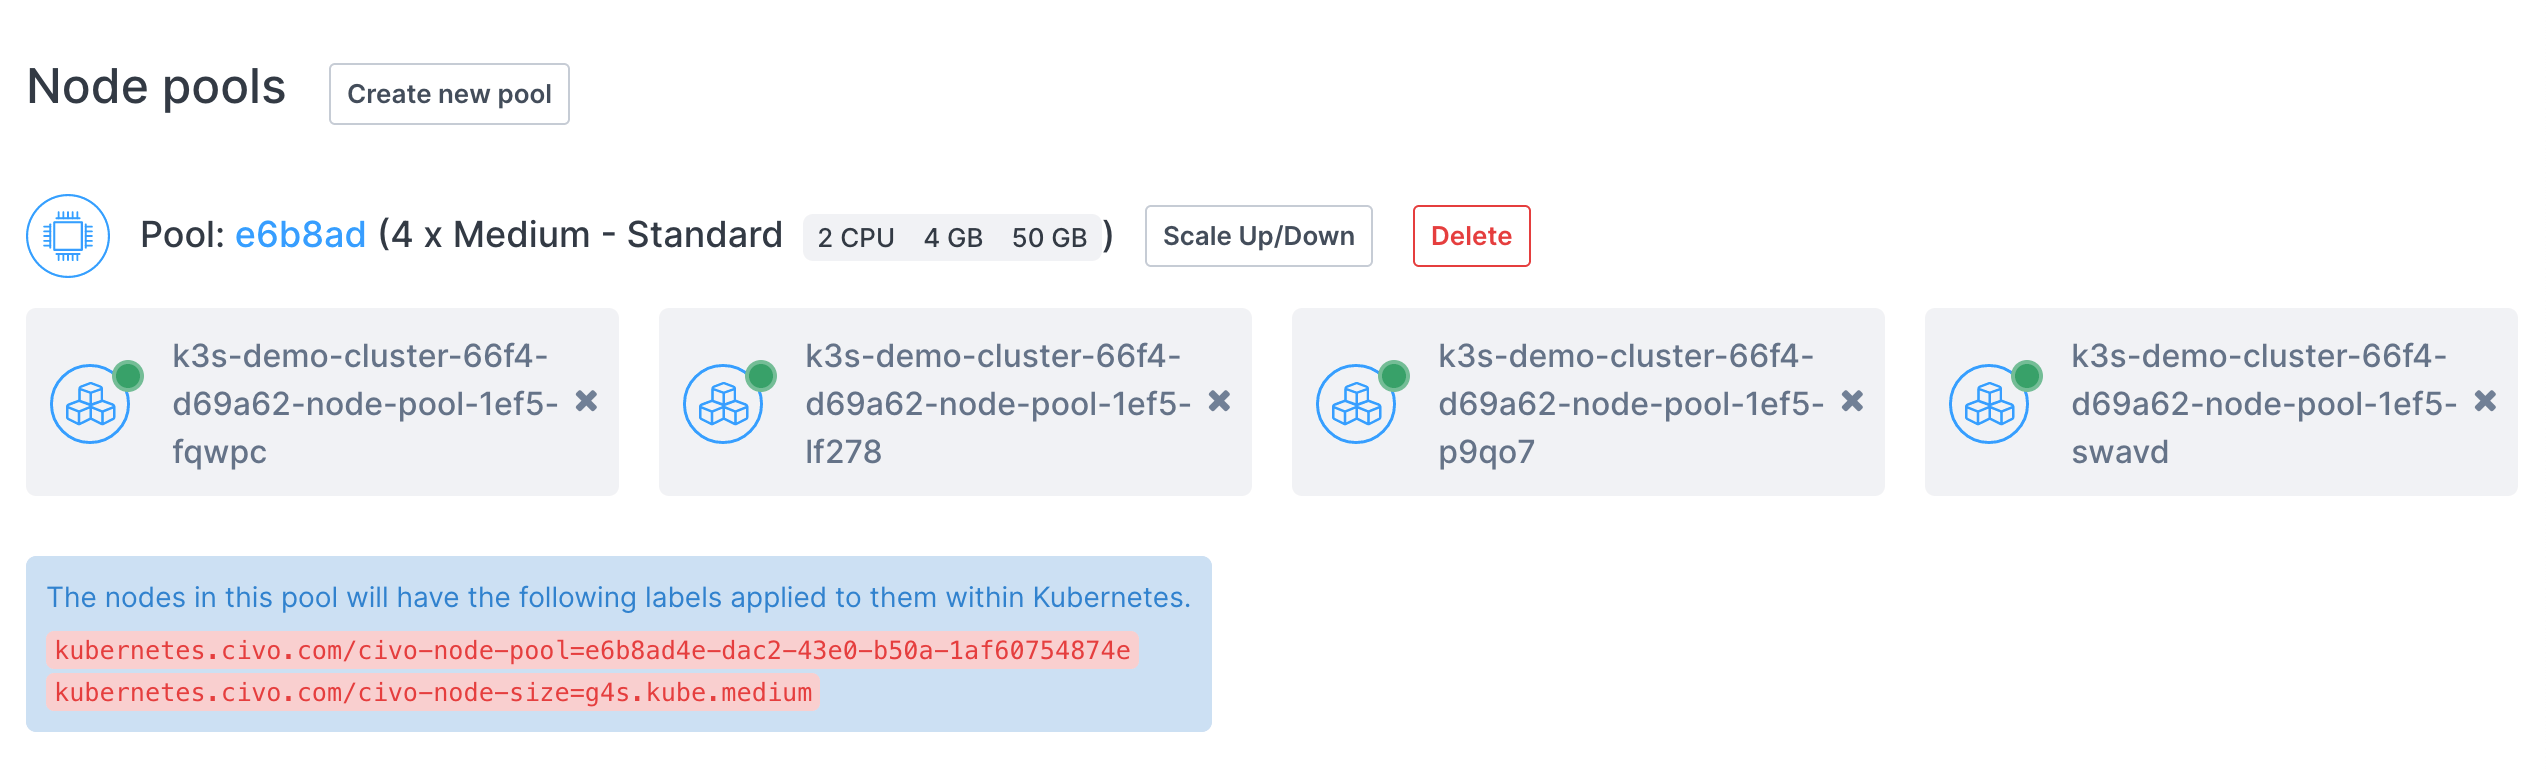
You will be taken to the pool creation page:
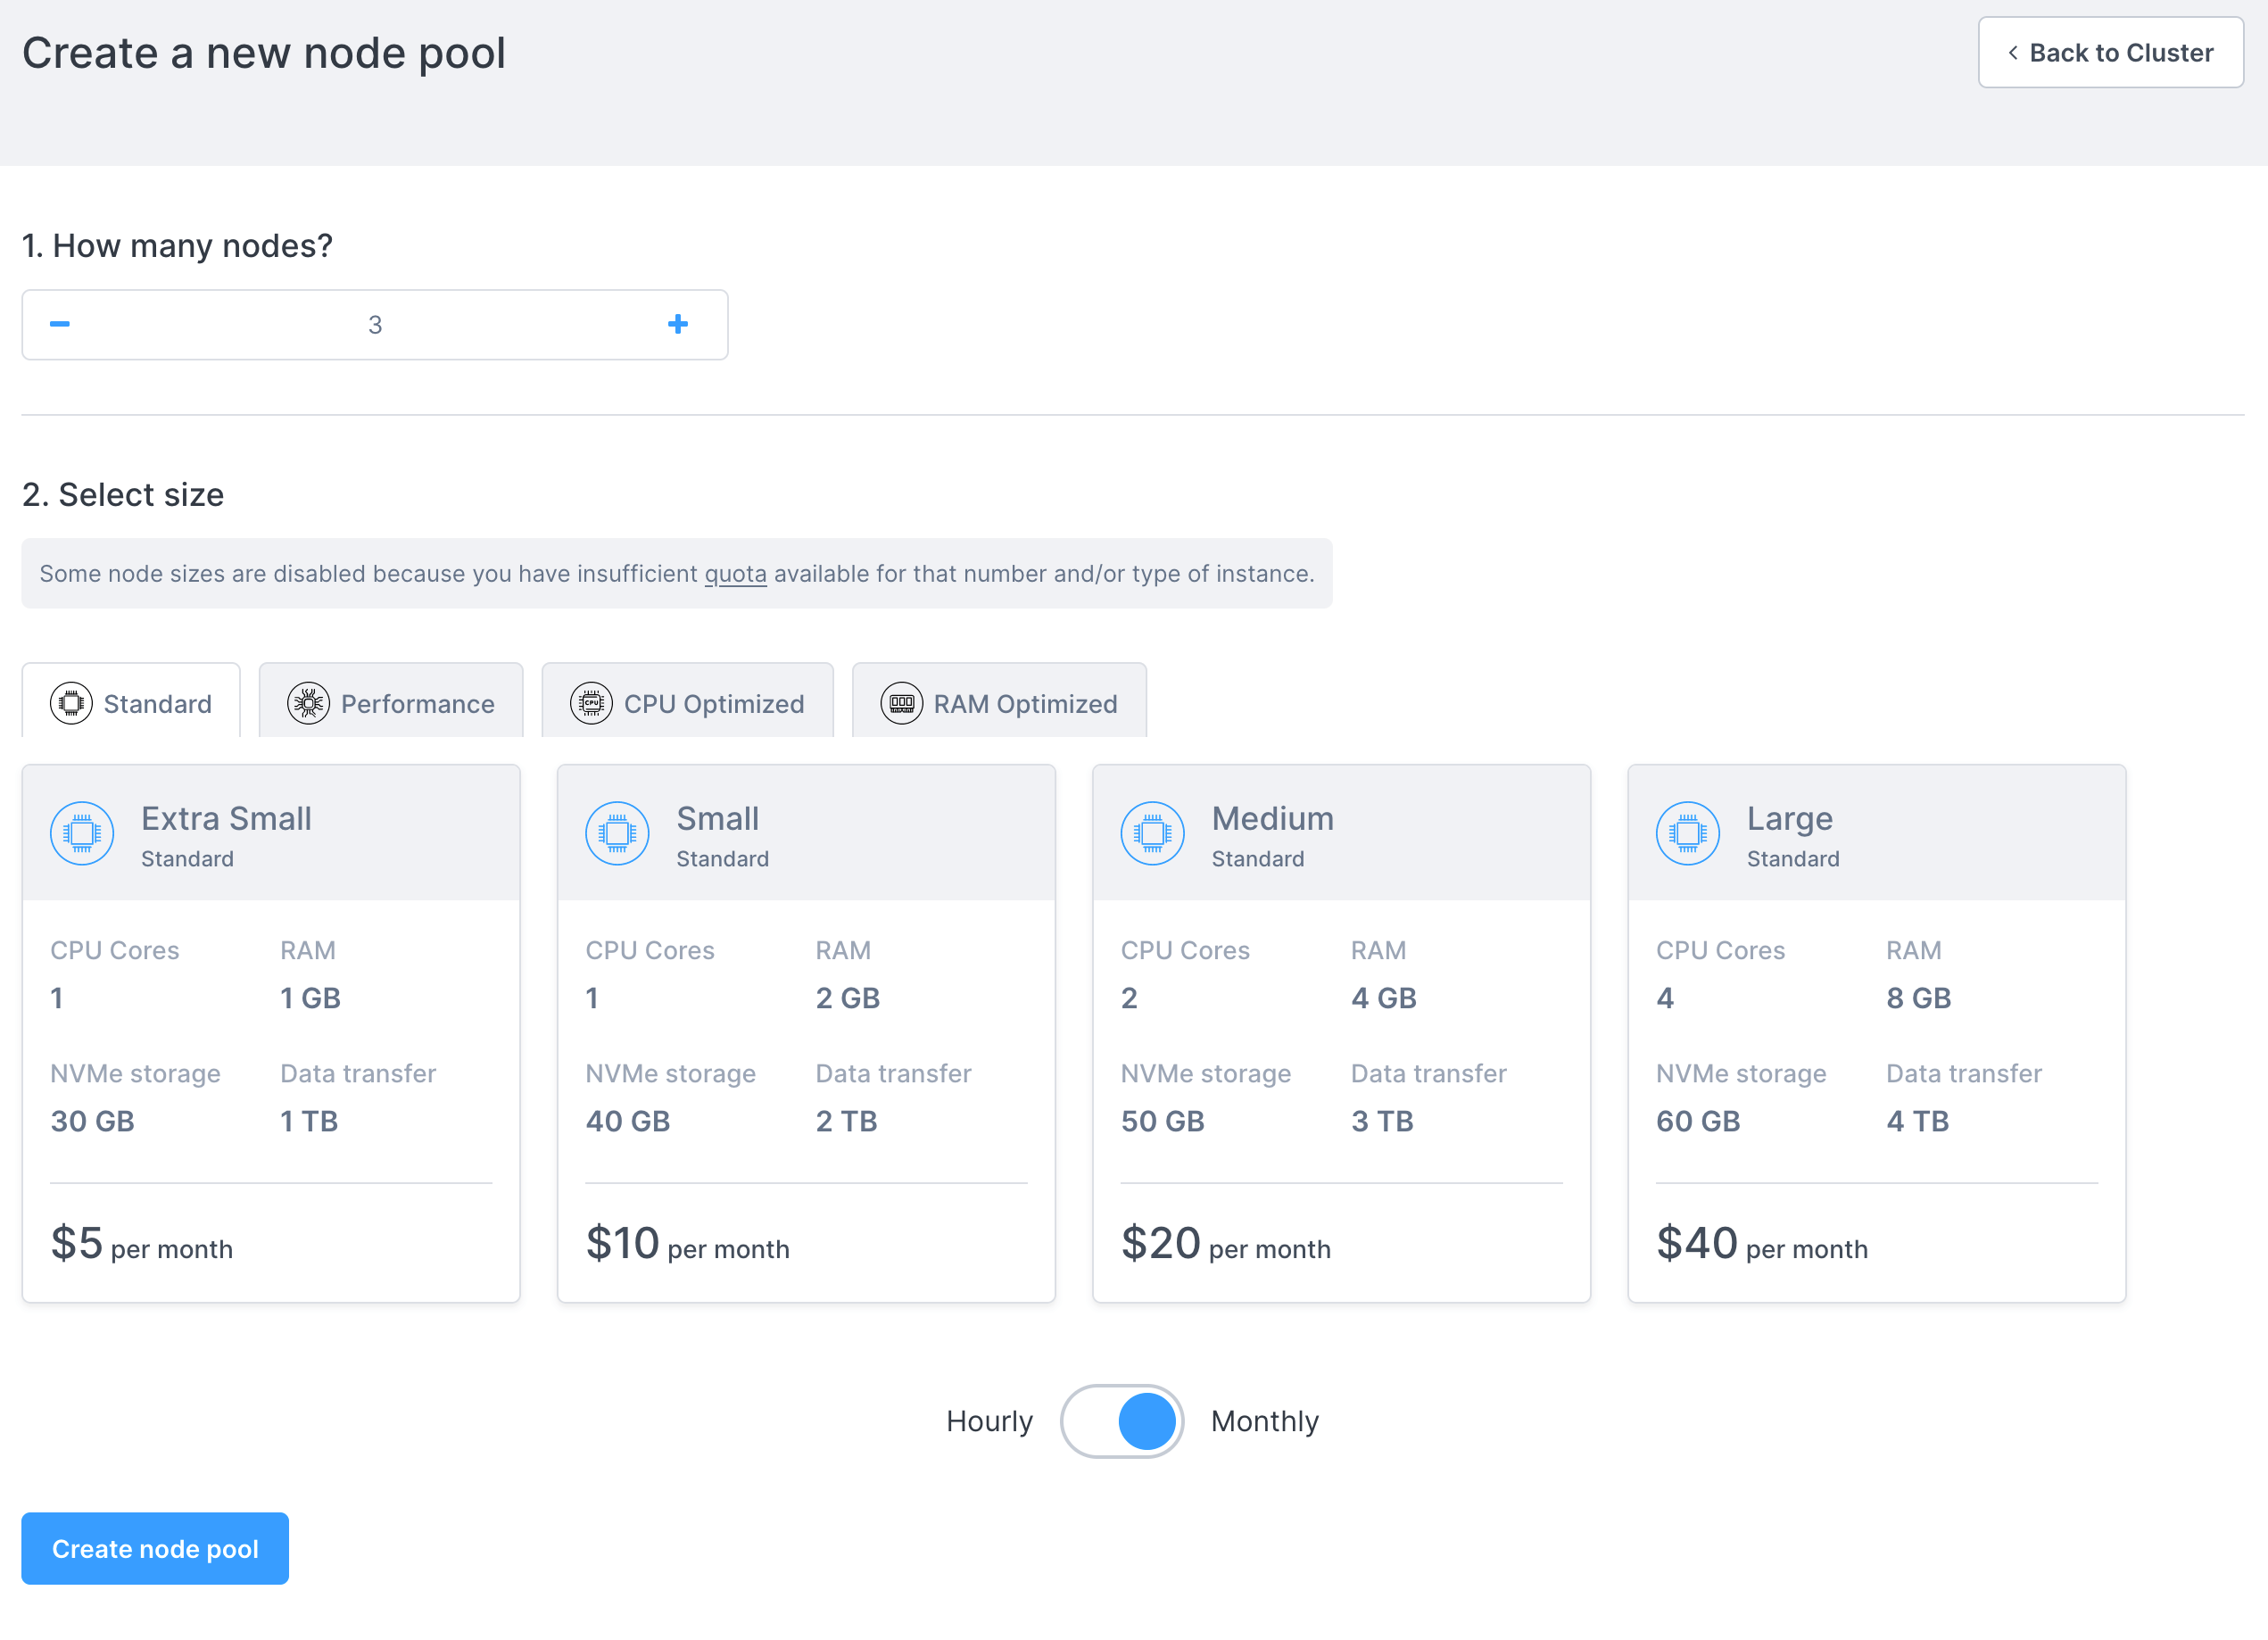
In this section, you can select the number of nodes to create in this new pool, and the specifications/size of the nodes to create. You can choose from the same sizes as when creating a cluster.
The cost per node of each type is displayed.
When you click "Create new pool" you will be taken back to the cluster information page and the new pool will be displayed as creating:
You can then specify specific tasks within your cluster to run on a specific pool's nodes, optimizing your cluster.
The command to add a node pool to a running cluster is civo kubernetes node-pool create CLUSTER_NAME -n NUMBER -s SIZE. For example, to add a new node pool of 2 g4s.kube.medium nodes to a cluster called "civo-cluster" you would use:
civo kubernetes node-pool create civo-cluster -n 2 -s g4s.kube.medium
The --size or -s parameter is followed by the code of the type of Kubernetes node you want to create, which you can get by running civo sizes ls.
1. Prepare the node pool configuration file
Once you have configured the Civo Terraform provider and successfully created a Kubernetes cluster resource in Terraform, you can define a new node pool as follows.
In the main.tf file, enter the following:
# Query xsmall instance size
data "civo_size" "xsmall" {
    filter {
        key = "type"
        values = ["kubernetes"]
    }

    sort {
        key = "ram"
        direction = "asc"
    }
}

# Query medium instance size
data "civo_size" "medium" {
    filter {
        key = "name"
        values = ["medium"]
        match_by = "re"
    }

    filter {
        key = "type"
        values = ["kubernetes"]
    }

    sort {
        key = "ram"
        direction = "asc"
    }
}

# Create a firewall
resource "civo_firewall" "my-firewall" {
    name = "my-firewall"
}

# Create a firewall rule
resource "civo_firewall_rule" "kubernetes" {
    firewall_id = civo_firewall.my-firewall.id
    protocol = "tcp"
    start_port = "6443"
    end_port = "6443"
    cidr = ["0.0.0.0/0"]
    direction = "ingress"
    label = "kubernetes-api-server"
    depends_on = [civo_firewall.my-firewall]
    action = "allow"
}

# Create a cluster
resource "civo_kubernetes_cluster" "my-cluster" {
    name = "my-cluster"
    pools {
        size = element(data.civo_size.xsmall.sizes, 0).name
        node_count = 3
    }
    firewall_id = civo_firewall.my-firewall.id
}

# Create a nodepool
resource "civo_kubernetes_node_pool" "back-end-nodepool" {
    region = civo_kubernetes_cluster.my-cluster.region
    cluster_id = civo_kubernetes_cluster.my-cluster.id
    size = element(data.civo_size.medium.sizes, 0).name
    node_count = 3
}
The sections of the above file are as follows:
-
Query xsmall instance size
- Using the
civo_sizedata source to find a list of compute instance sizes that match the filter:typeiskubernetes
- Sorting the result (instance sizes) by
RAMin ascending order (smallest first) - This data source can then be referred to as
data.civo_size.xsmall - To access the sizes later, we can use
data.civo_size.xsmall.sizessyntax wheresizesis the data source key that contains all the sizes (list)
- Using the
-
Create a firewall and Create a firewall rule
- Creates a new firewall and firewall rule for the Kubernetes cluster. Specifically, we are opening port 6443 so we can communicate with our cluster from outside e.g. through the
kubectlCLI. See the firewall creation documentation for more information.
- Creates a new firewall and firewall rule for the Kubernetes cluster. Specifically, we are opening port 6443 so we can communicate with our cluster from outside e.g. through the
-
Create a cluster
- Creates a new Kubernetes cluster using the civo_kubernetes_cluster resource in the
LON1region, with:- a name of
my-cluster, - target node size of 3 nodes,
- for the
target_nodes_sizefield, uses the first element (index 0) from thedata.civo_size.xsmall.sizeslist defined above, - assigns the
firewall_idof the firewall created earlier to the cluster, - a reference name of
civo_kubernetes_cluster.my-clusteryou can use to point to the cluster in other resources, if needed.
- a name of
- Creates a new Kubernetes cluster using the civo_kubernetes_cluster resource in the
-
Query medium instance size
- Uses the civo_instance_size data source to find a list of compute instance sizes that match with these filters:
namecontainsmedium,typeiskubernetes
- Sorting the result (instance sizes) by
RAMin ascending order (smallest first) - This data source can then be referred to as
data.civo_size.medium - To access the sizes later, we can use
data.civo_size.medium.sizessyntax wheresizesis the data source key that contains all the sizes (list)
- Uses the civo_instance_size data source to find a list of compute instance sizes that match with these filters:
-
Create a nodepool
- Creates a new node pool using the civo_kubernetes_node_pool resource, and:
- Calls it
back-end-nodepool - Sets the region to be in the same region where the
my-clusterKubernetes cluster is located - Links it to the
my-clustercluster using thecluster_idattribute - Sets the number of nodes in the pool to
3 - For the
sizefield, takes the first element (index 0) from thedata.civo_instances_size.medium.sizeslist fetched earlier - This node pool can then be referred to as
civo_kubernetes_node_pool.back-end-nodepoolin other resources, if needed
- Calls it
- Creates a new node pool using the civo_kubernetes_node_pool resource, and:
2. Plan
With the above configuration saved, you can run terraform plan to see the resources to be created:
$ terraform plan
Terraform used the selected providers to generate the following execution plan. Resource actions
are indicated with the following symbols:
  + create

Terraform will perform the following actions:

  # civo_firewall.my-firewall will be created
  + resource "civo_firewall" "my-firewall" {
      + create_default_rules = true
      + id                   = (known after apply)
      + name                 = "my-firewall"
      + network_id           = (known after apply)
    }

  # civo_firewall_rule.kubernetes will be created
  + resource "civo_firewall_rule" "kubernetes" {
      + action      = "allow"
      + cidr        = [
          + "0.0.0.0/0",
        ]
      + direction   = "ingress"
      + end_port    = "6443"
      + firewall_id = (known after apply)
      + id          = (known after apply)
      + label       = "kubernetes-api-server"
      + protocol    = "tcp"
      + region      = (known after apply)
      + start_port  = "6443"
    }

  # civo_kubernetes_cluster.my-cluster will be created
  + resource "civo_kubernetes_cluster" "my-cluster" {
      + api_endpoint           = (known after apply)
      + applications           = "Redis,Linkerd:Linkerd & Jaeger"
      + cni                    = (known after apply)
      + created_at             = (known after apply)
      + dns_entry              = (known after apply)
      + firewall_id            = (known after apply)
      + id                     = (known after apply)
      + installed_applications = (known after apply)
      + kubeconfig             = (sensitive value)
      + kubernetes_version     = (known after apply)
      + master_ip              = (known after apply)
      + name                   = "my-cluster"
      + network_id             = (known after apply)
      + num_target_nodes       = (known after apply)
      + ready                  = (known after apply)
      + region                 = (known after apply)
      + status                 = (known after apply)
      + target_nodes_size      = (known after apply)

      + pools {
          + id             = (known after apply)
          + instance_names = (known after apply)
          + node_count     = 3
          + size           = "g4s.kube.xsmall"
        }
    }

  # civo_kubernetes_node_pool.back-end-nodepool will be created
  + resource "civo_kubernetes_node_pool" "back-end-nodepool" {
      + cluster_id     = (known after apply)
      + id             = (known after apply)
      + instance_names = (known after apply)
      + node_count     = 3
      + region         = (known after apply)
      + size           = "g4s.kube.medium"
    }

Plan: 4 to add, 0 to change, 0 to destroy.

──────────────────────────────────────────────────────────────────────────────────────────────────────────────────────

Note: You didn't use the -out option to save this plan, so Terraform can't guarantee to take exactly these actions if
you run "terraform apply" now.
As you can see from the plan output above, Terraform will create a cluster (my-cluster) and a second node pool of 3 Medium size nodes for us. It will also create a firewall and firewall rule for our cluster.
3. Apply
To apply the configuration and allow Terraform to create the resources, run terraform apply and type yes when asked for confirmation:
$ terraform apply
Terraform used the selected providers to generate the following execution plan. Resource actions
are indicated with the following symbols:
  + create

Terraform will perform the following actions:

  # civo_firewall.my-firewall will be created
  + resource "civo_firewall" "my-firewall" {
      + create_default_rules = true
      + id                   = (known after apply)
      + name                 = "my-firewall"
      + network_id           = (known after apply)
    }

  # civo_firewall_rule.kubernetes will be created
  + resource "civo_firewall_rule" "kubernetes" {
      + action      = "allow"
      + cidr        = [
          + "0.0.0.0/0",
        ]
      + direction   = "ingress"
      + end_port    = "6443"
      + firewall_id = (known after apply)
      + id          = (known after apply)
      + label       = "kubernetes-api-server"
      + protocol    = "tcp"
      + region      = (known after apply)
      + start_port  = "6443"
    }

  # civo_kubernetes_cluster.my-cluster will be created
  + resource "civo_kubernetes_cluster" "my-cluster" {
      + api_endpoint           = (known after apply)
      + applications           = "Redis,Linkerd:Linkerd & Jaeger"
      + cni                    = (known after apply)
      + created_at             = (known after apply)
      + dns_entry              = (known after apply)
      + firewall_id            = (known after apply)
      + id                     = (known after apply)
      + installed_applications = (known after apply)
      + kubeconfig             = (sensitive value)
      + kubernetes_version     = (known after apply)
      + master_ip              = (known after apply)
      + name                   = "my-cluster"
      + network_id             = (known after apply)
      + num_target_nodes       = (known after apply)
      + ready                  = (known after apply)
      + region                 = (known after apply)
      + status                 = (known after apply)
      + target_nodes_size      = (known after apply)

      + pools {
          + id             = (known after apply)
          + instance_names = (known after apply)
          + node_count     = 3
          + size           = "g4s.kube.xsmall"
        }
    }

  # civo_kubernetes_node_pool.back-end-nodepool will be created
  + resource "civo_kubernetes_node_pool" "back-end-nodepool" {
      + cluster_id     = (known after apply)
      + id             = (known after apply)
      + instance_names = (known after apply)
      + node_count     = 2
      + region         = (known after apply)
      + size           = "g4s.kube.medium"
    }

Plan: 4 to add, 0 to change, 0 to destroy.

Do you want to perform these actions?
  Terraform will perform the actions described above.
  Only 'yes' will be accepted to approve.

  Enter a value: yes

civo_firewall.my-firewall: Creating...
civo_firewall.my-firewall: Creation complete after 4s [id=852e26c6-2ccc-4a75-b5dd-1c52838c9880]
civo_firewall_rule.kubernetes: Creating...
civo_kubernetes_cluster.my-cluster: Creating...
civo_firewall_rule.kubernetes: Creation complete after 2s [id=a3393880-720f-44d1-ac39-902663d6c60e]
civo_kubernetes_cluster.my-cluster: Still creating... [10s elapsed]
civo_kubernetes_cluster.my-cluster: Still creating... [20s elapsed]
civo_kubernetes_cluster.my-cluster: Still creating... [30s elapsed]
civo_kubernetes_cluster.my-cluster: Still creating... [40s elapsed]
civo_kubernetes_cluster.my-cluster: Still creating... [50s elapsed]
civo_kubernetes_cluster.my-cluster: Still creating... [1m0s elapsed]
civo_kubernetes_cluster.my-cluster: Still creating... [1m10s elapsed]
civo_kubernetes_cluster.my-cluster: Still creating... [1m20s elapsed]
civo_kubernetes_cluster.my-cluster: Still creating... [1m30s elapsed]
civo_kubernetes_cluster.my-cluster: Creation complete after 1m30s [id=e2efe4ff-9479-4429-927f-8a62161684c2]
civo_kubernetes_node_pool.back-end-nodepool: Creating...
civo_kubernetes_node_pool.back-end-nodepool: Still creating... [10s elapsed]
civo_kubernetes_node_pool.back-end-nodepool: Still creating... [20s elapsed]
civo_kubernetes_node_pool.back-end-nodepool: Still creating... [30s elapsed]
civo_kubernetes_node_pool.back-end-nodepool: Still creating... [40s elapsed]
civo_kubernetes_node_pool.back-end-nodepool: Still creating... [50s elapsed]
civo_kubernetes_node_pool.back-end-nodepool: Still creating... [1m0s elapsed]
civo_kubernetes_node_pool.back-end-nodepool: Creation complete after 1m4s [id=6380b6aa-c766-44d2-936a-07f150449332]
When the creation completes, refresh your Civo web dashboard. You should see the new cluster on the Kubernetes page. Click it to see more details. It should show both node pools running:
Updating a node pool configuration on Terraform
If you notice, there will be a new file named terraform.tfstate in your local project directory after applying the configuration. Its contents will be along the lines of the following:
$ cat terraform.tfstate
{
"version": 4,
"terraform_version": "1.1.7",
"serial": 27,
"lineage": "11e2d21c-43f7-f4fc-51d6-cfa40e143814",
"outputs": {},
"resources": [
{
"mode": "data",
"type": "civo_size",
"name": "medium",
"provider": "provider[\"registry.terraform.io/civo/civo\"]",
"instances": [
{
"schema_version": 0,
"attributes": {
"filter": [
{
"all": false,
"key": "name",
"match_by": "re",
"values": [
"medium"
]
},
{
"all": false,
"key": "type",
"match_by": "exact",
"values": [
"kubernetes"
]
}
],
"id": "terraform-20220411090211198400000001",
"sizes": [
{
"cpu": 2,
"description": "Medium - Standard",
"disk": 50,
"name": "g4s.kube.medium",
"ram": 4096,
"selectable": true,
"type": "kubernetes"
},
{
"cpu": 4,
"description": "Medium - RAM optimized",
"disk": 80,
"name": "g4m.kube.medium",
"ram": 32768,
"selectable": true,
"type": "kubernetes"
},
{
"cpu": 16,
"description": "Medium - CPU optimized",
"disk": 80,
"name": "g4c.kube.medium",
"ram": 32768,
"selectable": true,
"type": "kubernetes"
},
{
"cpu": 8,
"description": "Medium - Performance",
"disk": 80,
"name": "g4p.kube.medium",
"ram": 32768,
"selectable": true,
"type": "kubernetes"
}
],
"sort": [
{
"direction": "asc",
"key": "ram"
}
]
},
"sensitive_attributes": []
}
]
},
{
"mode": "data",
"type": "civo_size",
"name": "xsmall",
"provider": "provider[\"registry.terraform.io/civo/civo\"]",
"instances": [
{
"schema_version": 0,
"attributes": {
"filter": [
{
"all": false,
"key": "type",
"match_by": "exact",
"values": [
"kubernetes"
]
}
],
"id": "terraform-20220411090211242900000002",
"sizes": [
{
"cpu": 1,
"description": "Extra Small - Standard",
"disk": 30,
"name": "g4s.kube.xsmall",
"ram": 1024,
"selectable": true,
"type": "kubernetes"
},
{
"cpu": 1,
"description": "Small - Standard",
"disk": 40,
"name": "g4s.kube.small",
"ram": 2048,
"selectable": true,
"type": "kubernetes"
},
{
"cpu": 2,
"description": "Medium - Standard",
"disk": 50,
"name": "g4s.kube.medium",
"ram": 4096,
"selectable": true,
"type": "kubernetes"
},
{
"cpu": 4,
"description": "Large - Standard",
"disk": 60,
"name": "g4s.kube.large",
"ram": 8192,
"selectable": true,
"type": "kubernetes"
},
{
"cpu": 4,
"description": "Small - Performance",
"disk": 60,
"name": "g4p.kube.small",
"ram": 16384,
"selectable": true,
"type": "kubernetes"
},
{
"cpu": 8,
"description": "Small - CPU optimized",
"disk": 60,
"name": "g4c.kube.small",
"ram": 16384,
"selectable": true,
"type": "kubernetes"
},
{
"cpu": 2,
"description": "Small - RAM optimized",
"disk": 60,
"name": "g4m.kube.small",
"ram": 16384,
"selectable": true,
"type": "kubernetes"
},
{
"cpu": 16,
"description": "Medium - CPU optimized",
"disk": 80,
"name": "g4c.kube.medium",
"ram": 32768,
"selectable": true,
"type": "kubernetes"
},
{
"cpu": 8,
"description": "Medium - Performance",
"disk": 80,
"name": "g4p.kube.medium",
"ram": 32768,
"selectable": true,
"type": "kubernetes"
},
{
"cpu": 4,
"description": "Medium - RAM optimized",
"disk": 80,
"name": "g4m.kube.medium",
"ram": 32768,
"selectable": true,
"type": "kubernetes"
},
{
"cpu": 8,
"description": "Large - RAM optimized",
"disk": 120,
"name": "g4m.kube.large",
"ram": 65536,
"selectable": true,
"type": "kubernetes"
},
{
"cpu": 16,
"description": "Large - Performance",
"disk": 120,
"name": "g4p.kube.large",
"ram": 65536,
"selectable": true,
"type": "kubernetes"
},
{
"cpu": 32,
"description": "Large - CPU optimized",
"disk": 120,
"name": "g4c.kube.large",
"ram": 65536,
"selectable": true,
"type": "kubernetes"
},
{
"cpu": 16,
"description": "Extra Large - RAM optimized",
"disk": 180,
"name": "g4m.kube.xlarge",
"ram": 131072,
"selectable": true,
"type": "kubernetes"
},
{
"cpu": 32,
"description": "Extra Large - Performance",
"disk": 180,
"name": "g4p.kube.xlarge",
"ram": 131072,
"selectable": true,
"type": "kubernetes"
},
{
"cpu": 64,
"description": "Extra Large - CPU optimized",
"disk": 180,
"name": "g4c.kube.xlarge",
"ram": 131072,
"selectable": true,
"type": "kubernetes"
}
],
"sort": [
{
"direction": "asc",
"key": "ram"
}
]
},
"sensitive_attributes": []
}
]
},
{
"mode": "managed",
"type": "civo_firewall",
"name": "my-firewall",
"provider": "provider[\"registry.terraform.io/civo/civo\"]",
"instances": [
{
"schema_version": 0,
"attributes": {
"create_default_rules": true,
"id": "852e26c6-2ccc-4a75-b5dd-1c52838c9880",
"name": "my-firewall",
"network_id": "28244c7d-b1b9-48cf-9727-aebb3493aaac",
"region": null
},
"sensitive_attributes": [],
"private": "bnVsbA=="
}
]
},
{
"mode": "managed",
"type": "civo_firewall_rule",
"name": "kubernetes",
"provider": "provider[\"registry.terraform.io/civo/civo\"]",
"instances": [
{
"schema_version": 0,
"attributes": {
"action": "allow",
"cidr": [
"0.0.0.0/0"
],
"direction": "ingress",
"end_port": "6443",
"firewall_id": "852e26c6-2ccc-4a75-b5dd-1c52838c9880",
"id": "a3393880-720f-44d1-ac39-902663d6c60e",
"label": "kubernetes-api-server",
"protocol": "tcp",
"region": null,
"start_port": "6443"
},
"sensitive_attributes": [],
"private": "bnVsbA==",
"dependencies": [
"civo_firewall.my-firewall"
]
}
]
},
{
"mode": "managed",
"type": "civo_kubernetes_cluster",
"name": "my-cluster",
"provider": "provider[\"registry.terraform.io/civo/civo\"]",
"instances": [
{
"schema_version": 0,
"attributes": {
"api_endpoint": "https://74.220.17.180:6443",
"applications": "Redis,Linkerd:Linkerd \u0026 Jaeger",
"cni": "flannel",
"created_at": "2022-04-11 09:02:19 +0000 UTC",
"dns_entry": "e2efe4ff-9479-4429-927f-8a62161684c2.k8s.civo.com",
"firewall_id": "852e26c6-2ccc-4a75-b5dd-1c52838c9880",
"id": "e2efe4ff-9479-4429-927f-8a62161684c2",
"installed_applications": [
{
"application": "Redis",
"category": "database",
"installed": false,
"version": "3.2"
},
{
"application": "Linkerd",
"category": "architecture",
"installed": false,
"version": "Latest"
}
],
"kubeconfig": "apiVersion: v1\nclusters:\n- cluster:\n certificate-authority-data: LS0tLSd=\n",
"kubernetes_version": "1.22.2-k3s1",
"master_ip": "74.220.17.180",
"name": "my-cluster",
"network_id": "28244c7d-b1b9-48cf-9727-aebb3493aaac",
"num_target_nodes": 3,
"pools": [
{
"id": "28cc101c-a7ae-4f7e-af51-52af96c14f9f",
"instance_names": [
"k3s-my-cluster-2899-bbffc3-node-pool-7d55",
"k3s-my-cluster-2899-bbffc3-node-pool-8694",
"k3s-my-cluster-2899-bbffc3-node-pool-fb6d"
],
"node_count": 3,
"size": "g4s.kube.xsmall"
}
],
"ready": true,
"region": "LON1",
"status": "ACTIVE",
"tags": "",
"target_nodes_size": "g4s.kube.xsmall"
},
"sensitive_attributes": [],
"private": "bnVsbA==",
"dependencies": [
"civo_firewall.my-firewall",
"data.civo_size.xsmall"
]
}
]
},
{
"mode": "managed",
"type": "civo_kubernetes_node_pool",
"name": "back-end-nodepool",
"provider": "provider[\"registry.terraform.io/civo/civo\"]",
"instances": [
{
"schema_version": 0,
"attributes": {
"cluster_id": "e2efe4ff-9479-4429-927f-8a62161684c2",
"id": "6380b6aa-c766-44d2-936a-07f150449332",
"instance_names": [
"k3s-my-cluster-2899-bbffc3-node-pool-1744",
"k3s-my-cluster-2899-bbffc3-node-pool-6de4",
"k3s-my-cluster-2899-bbffc3-node-pool-f26d"
],
"node_count": 3,
"num_target_nodes": null,
"region": "LON1",
"size": "g4s.kube.medium",
"target_nodes_size": null,
"timeouts": null
},
"sensitive_attributes": [],
"private": "eyJlMm",
"dependencies": [
"civo_firewall.my-firewall",
"civo_kubernetes_cluster.my-cluster",
"data.civo_size.medium",
"data.civo_size.xsmall"
]
}
]
}
]
}
This is the Terraform State File which is created when the configuration is applied.
If you update your main.tf file and run terraform apply again, Terraform will refresh the state file, try to understand what you want to update and update your defined resources, in this case a cluster and its associated node pools, accordingly.
If there's no change in your main.tf file and you rerun terraform apply, it will output a No changes. Your infrastructure matches the configuration message back to you.
Deleting a node pool
- Dashboard
- Civo CLI
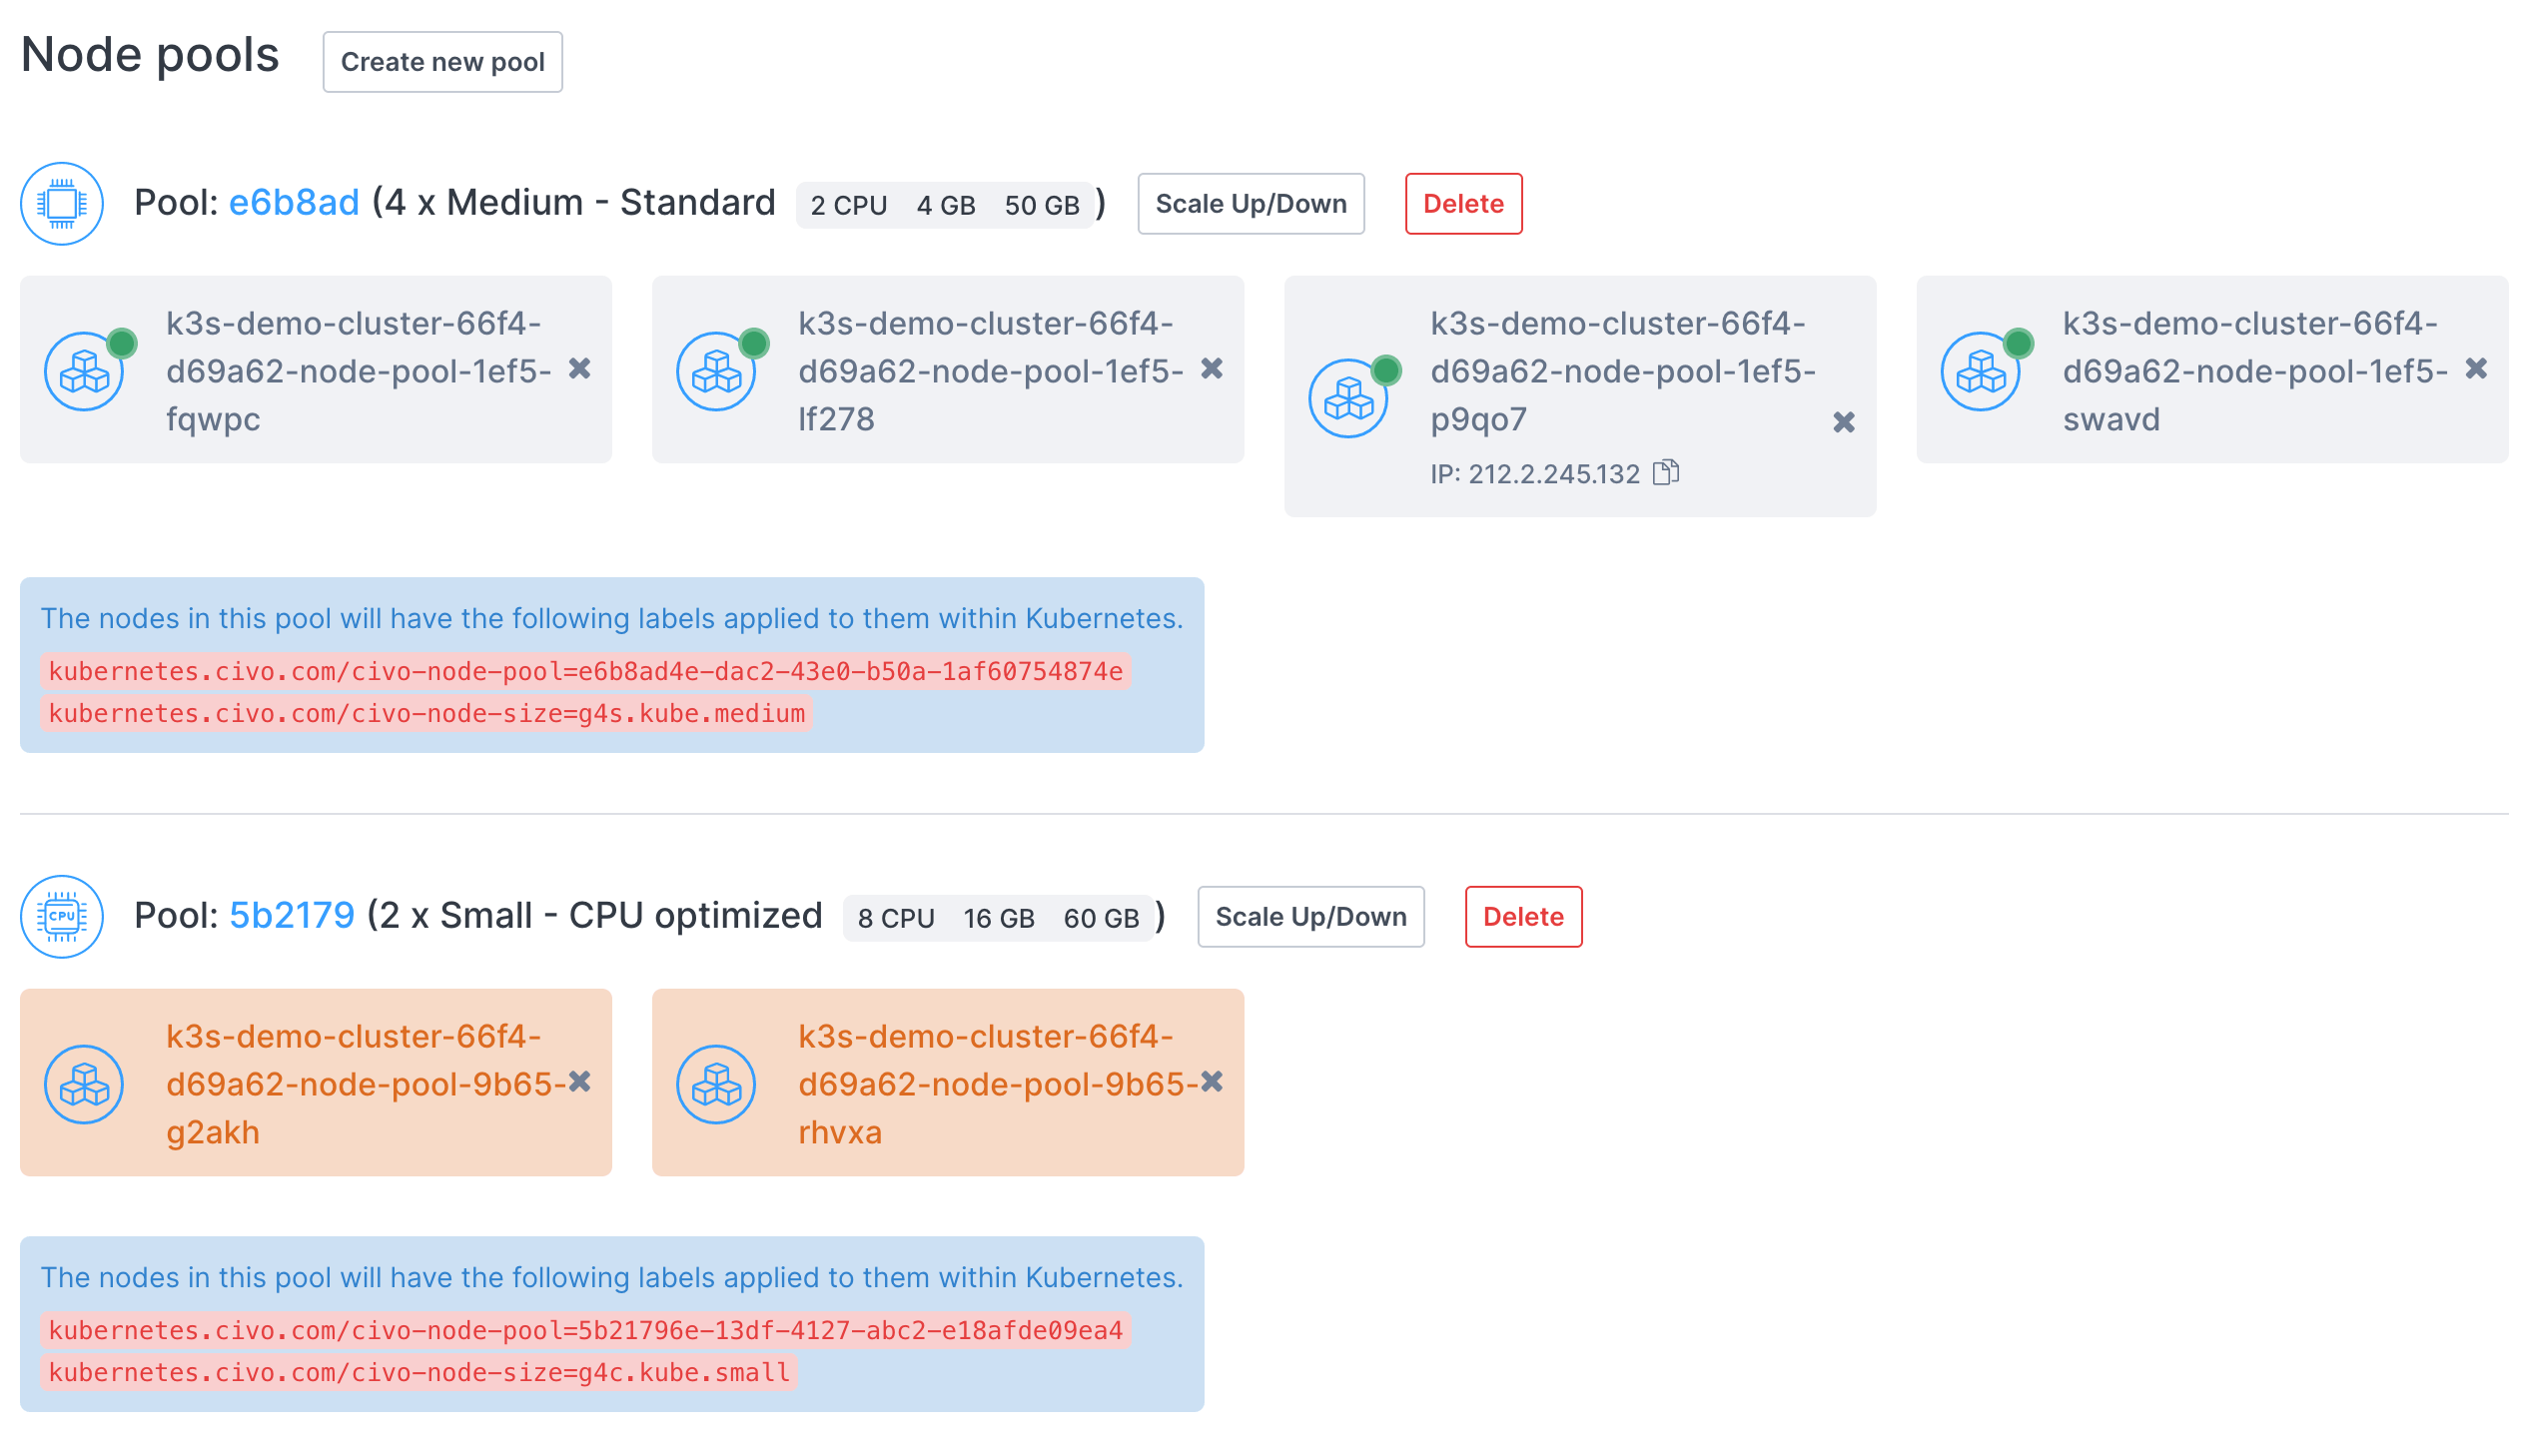
You can delete a node pool entirely by clicking on the "Delete" button next to the node pool information.
A popup will appear asking you to confirm that you want to delete the node pool by entering its name:
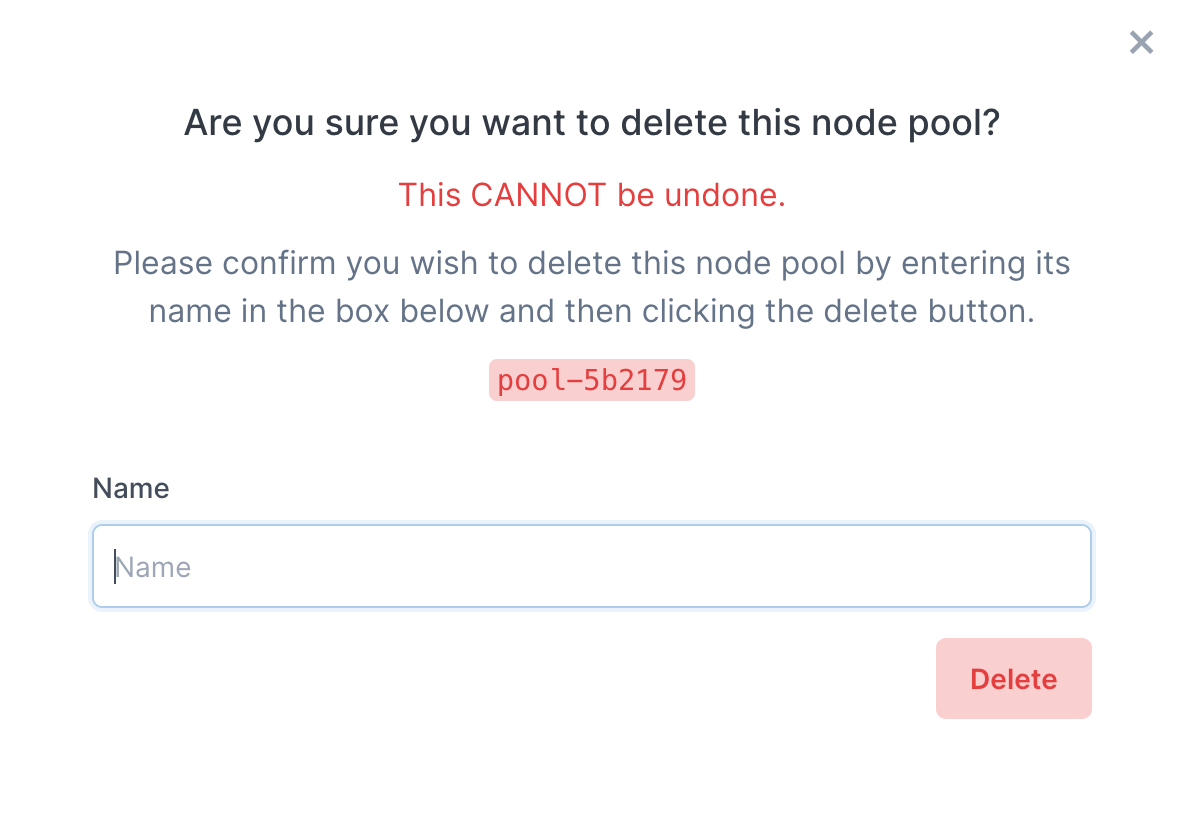
The pool will be deleted as soon as you click "Delete" and is irreversible. All workloads in that pool will be destroyed and re-allocated in your cluster.
Deletion of a node pool through the CLI uses the syntax civo kubernetes node-pool delete CLUSTER_NAME POOL_ID.
You can retrieve the pool ID by running civo kubernetes show CLUSTER_NAME. It will be shown as part of the node pools section in parentheses:
[...]
Pool (5b2179):
+---------------------------------------------------+----+--------+----------------+-----------+----------+---------------+
| Name                                              | IP | Status | Size           | Cpu Cores | RAM (MB) | SSD disk (GB) |
+---------------------------------------------------+----+--------+----------------+-----------+----------+---------------+
| k3s-demo-cluster-66f4-d69a62-node-pool-9b65-g2akh |    | ACTIVE | g4c.kube.small |         8 |    16384 |            60 |
| k3s-demo-cluster-66f4-d69a62-node-pool-9b65-rhvxa |    | ACTIVE | g4c.kube.small |         8 |    16384 |            60 |
+---------------------------------------------------+----+--------+----------------+-----------+----------+---------------+

Labels:
kubernetes.civo.com/node-pool=5b21796e-13df-4127-abc2-e18afde09ea4
kubernetes.civo.com/node-size=g4c.kube.small
[... continues]
In this case the id is 52b2179, and the cluster name is demo-cluster. You can delete the node pool, therefore, by running
civo kubernetes node-pool delete demo-cluster 5b2179
The CLI would confirm the deletion:
Warning: Are you sure you want to delete the 5b2179 node pool (y/N) ? y
The node pool (5b21796e-13df-4127-abc2-e18afde09ea4) has been deleted from the cluster (demo-cluster)
Recycling nodes
If you need to rebuild nodes for whatever reason, you can use the recycle method to rebuild a single node.
Recycling a node will delete it entirely, rebuild a new node to match it, and attach that to your cluster. When a node is recycled, it is fully deleted. The recycle command does not drain a node, it simply deletes it before building a new node and attaching it to a cluster. It is intended for scenarios where the node itself develops an issue and must be replaced with a new one.
- Dashboard
- Civo CLI
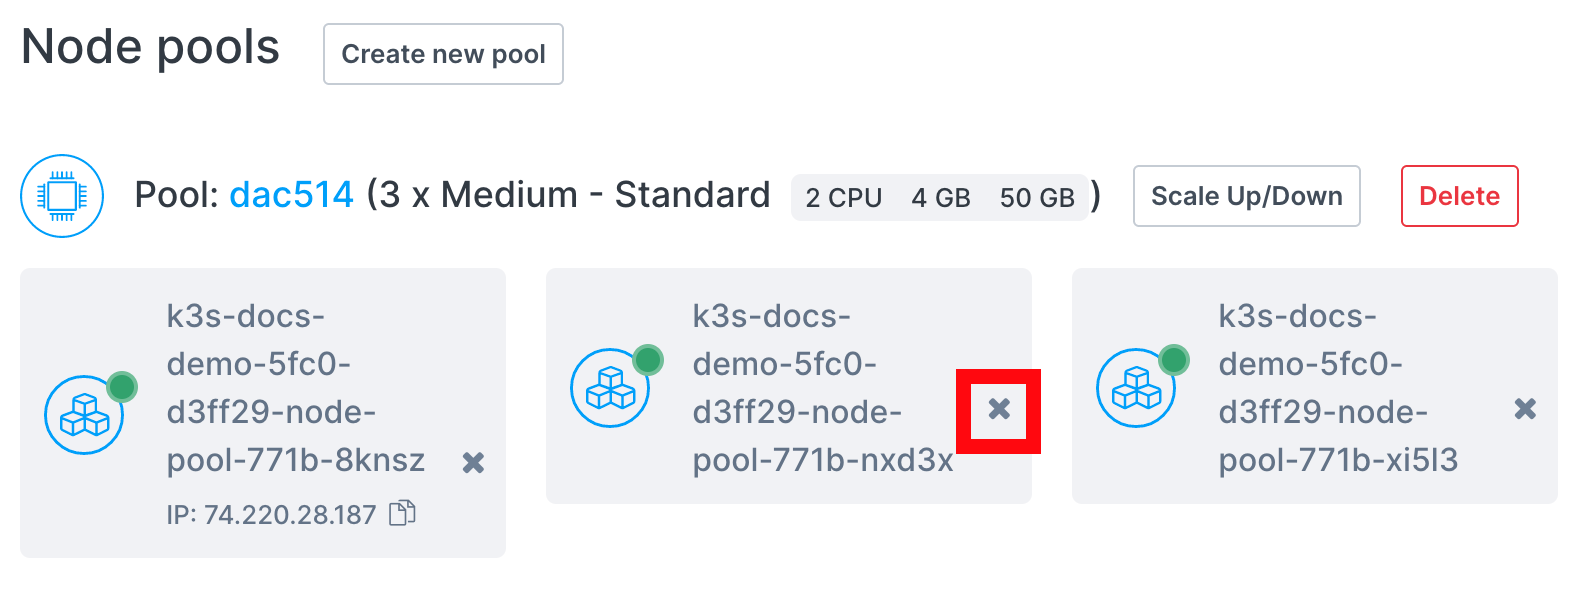
Recycling a node on the dashboard is done on the Kubernetes cluster management page in the Node Pools section. Each node will have its own button to recycle, highlighted in the image below:
Once you click the recycle button, you will be prompted to confirm your choice:
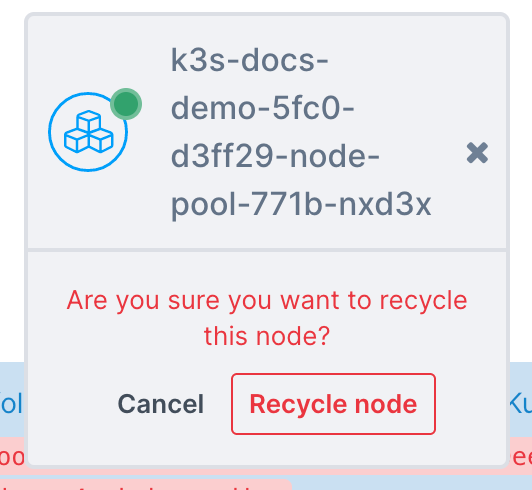
The confirmation is important, as the node is immediately torn down and replaced when recycled.
The CLI command to recycle a node takes the format civo kubernetes recycle. This takes as arguments your cluster and the specific node you wish to recycle:
$ civo kubernetes recycle kube_demo --node kube-node-2f5d
The node (kube-node-2f5d) was recycled
If you were to look at the output of civo kubernetes show (cluster_name) you would see the node being rebuilt and the status reflecting that.
Deleting a specific node
You may want to remove one particular node from a cluster, for example to retire a node that is misbehaving.
kubectl does not delete the VMRunning kubectl delete node <node-name> removes the node object from the Kubernetes API — the node disappears from kubectl get nodes and appears to be deleted — but the underlying Civo instance (VM) keeps running and remains billable. The node is not actually torn down.
To remove the VM itself, scale down the node pool as described below.
To delete a specific node and its underlying VM, cordon and drain the node so its workloads are rescheduled elsewhere, then scale the node pool down. Cordoned nodes are prioritized for removal when scaling down, so the node you cordoned is the one that gets removed.
-
Cordon the node to stop new pods from being scheduled onto it:
kubectl cordon <node-name> -
Drain the node to gracefully evict its running workloads so they reschedule onto other nodes:
kubectl drain <node-name> --ignore-daemonsets --delete-emptydir-data -
Scale the node pool down by one node using the Dashboard, Civo CLI, or Terraform. Because the node you cordoned is prioritized for removal, it is the node that gets deleted, and its VM is torn down.
This differs from recycling a node, which deletes a node and immediately rebuilds a replacement to keep the pool at the same size. Scaling down after cordoning removes the node without replacing it, reducing the pool size by one.