Creating a Kubernetes cluster
Overview
Setting up a managed Kubernetes cluster on Civo offers a smooth experience, enabling you to personalise different components of your cluster for an ideal configuration. Civo also provides a number of CPU and GPU options to ensure optimal performance, cost-efficiency, and scalability.
Running GPU workloads (for example: TensorFlow, PyTorch, Real-time Inference) on Kubernetes requires higher computational requirements. In addition, large models require nodes with more GPU memory.
For details on creating and configuring a GPU Cluster check out the GPU Clusters page
Deploying Workloads on Civo Kubernetes
Civo Kubernetes supports deploying Standard, Performance, or CPU-Optimized workloads.
The following instructions outline the steps for creating a Kubernetes cluster for standard workloads, with options to set up the cluster using the Civo Dashboard, Civo CLI, or Terraform.
- Dashboard
- Civo CLI
Creating a Cluster with the Dashboard
Step 1 - Select your region
Select the Civo Region in which you are operating in the lower left of your Dashboard page.
Step 2 - Navigate to the cluster creation page
From your Civo dashboard, navigate to the Kubernetes cluster creation page
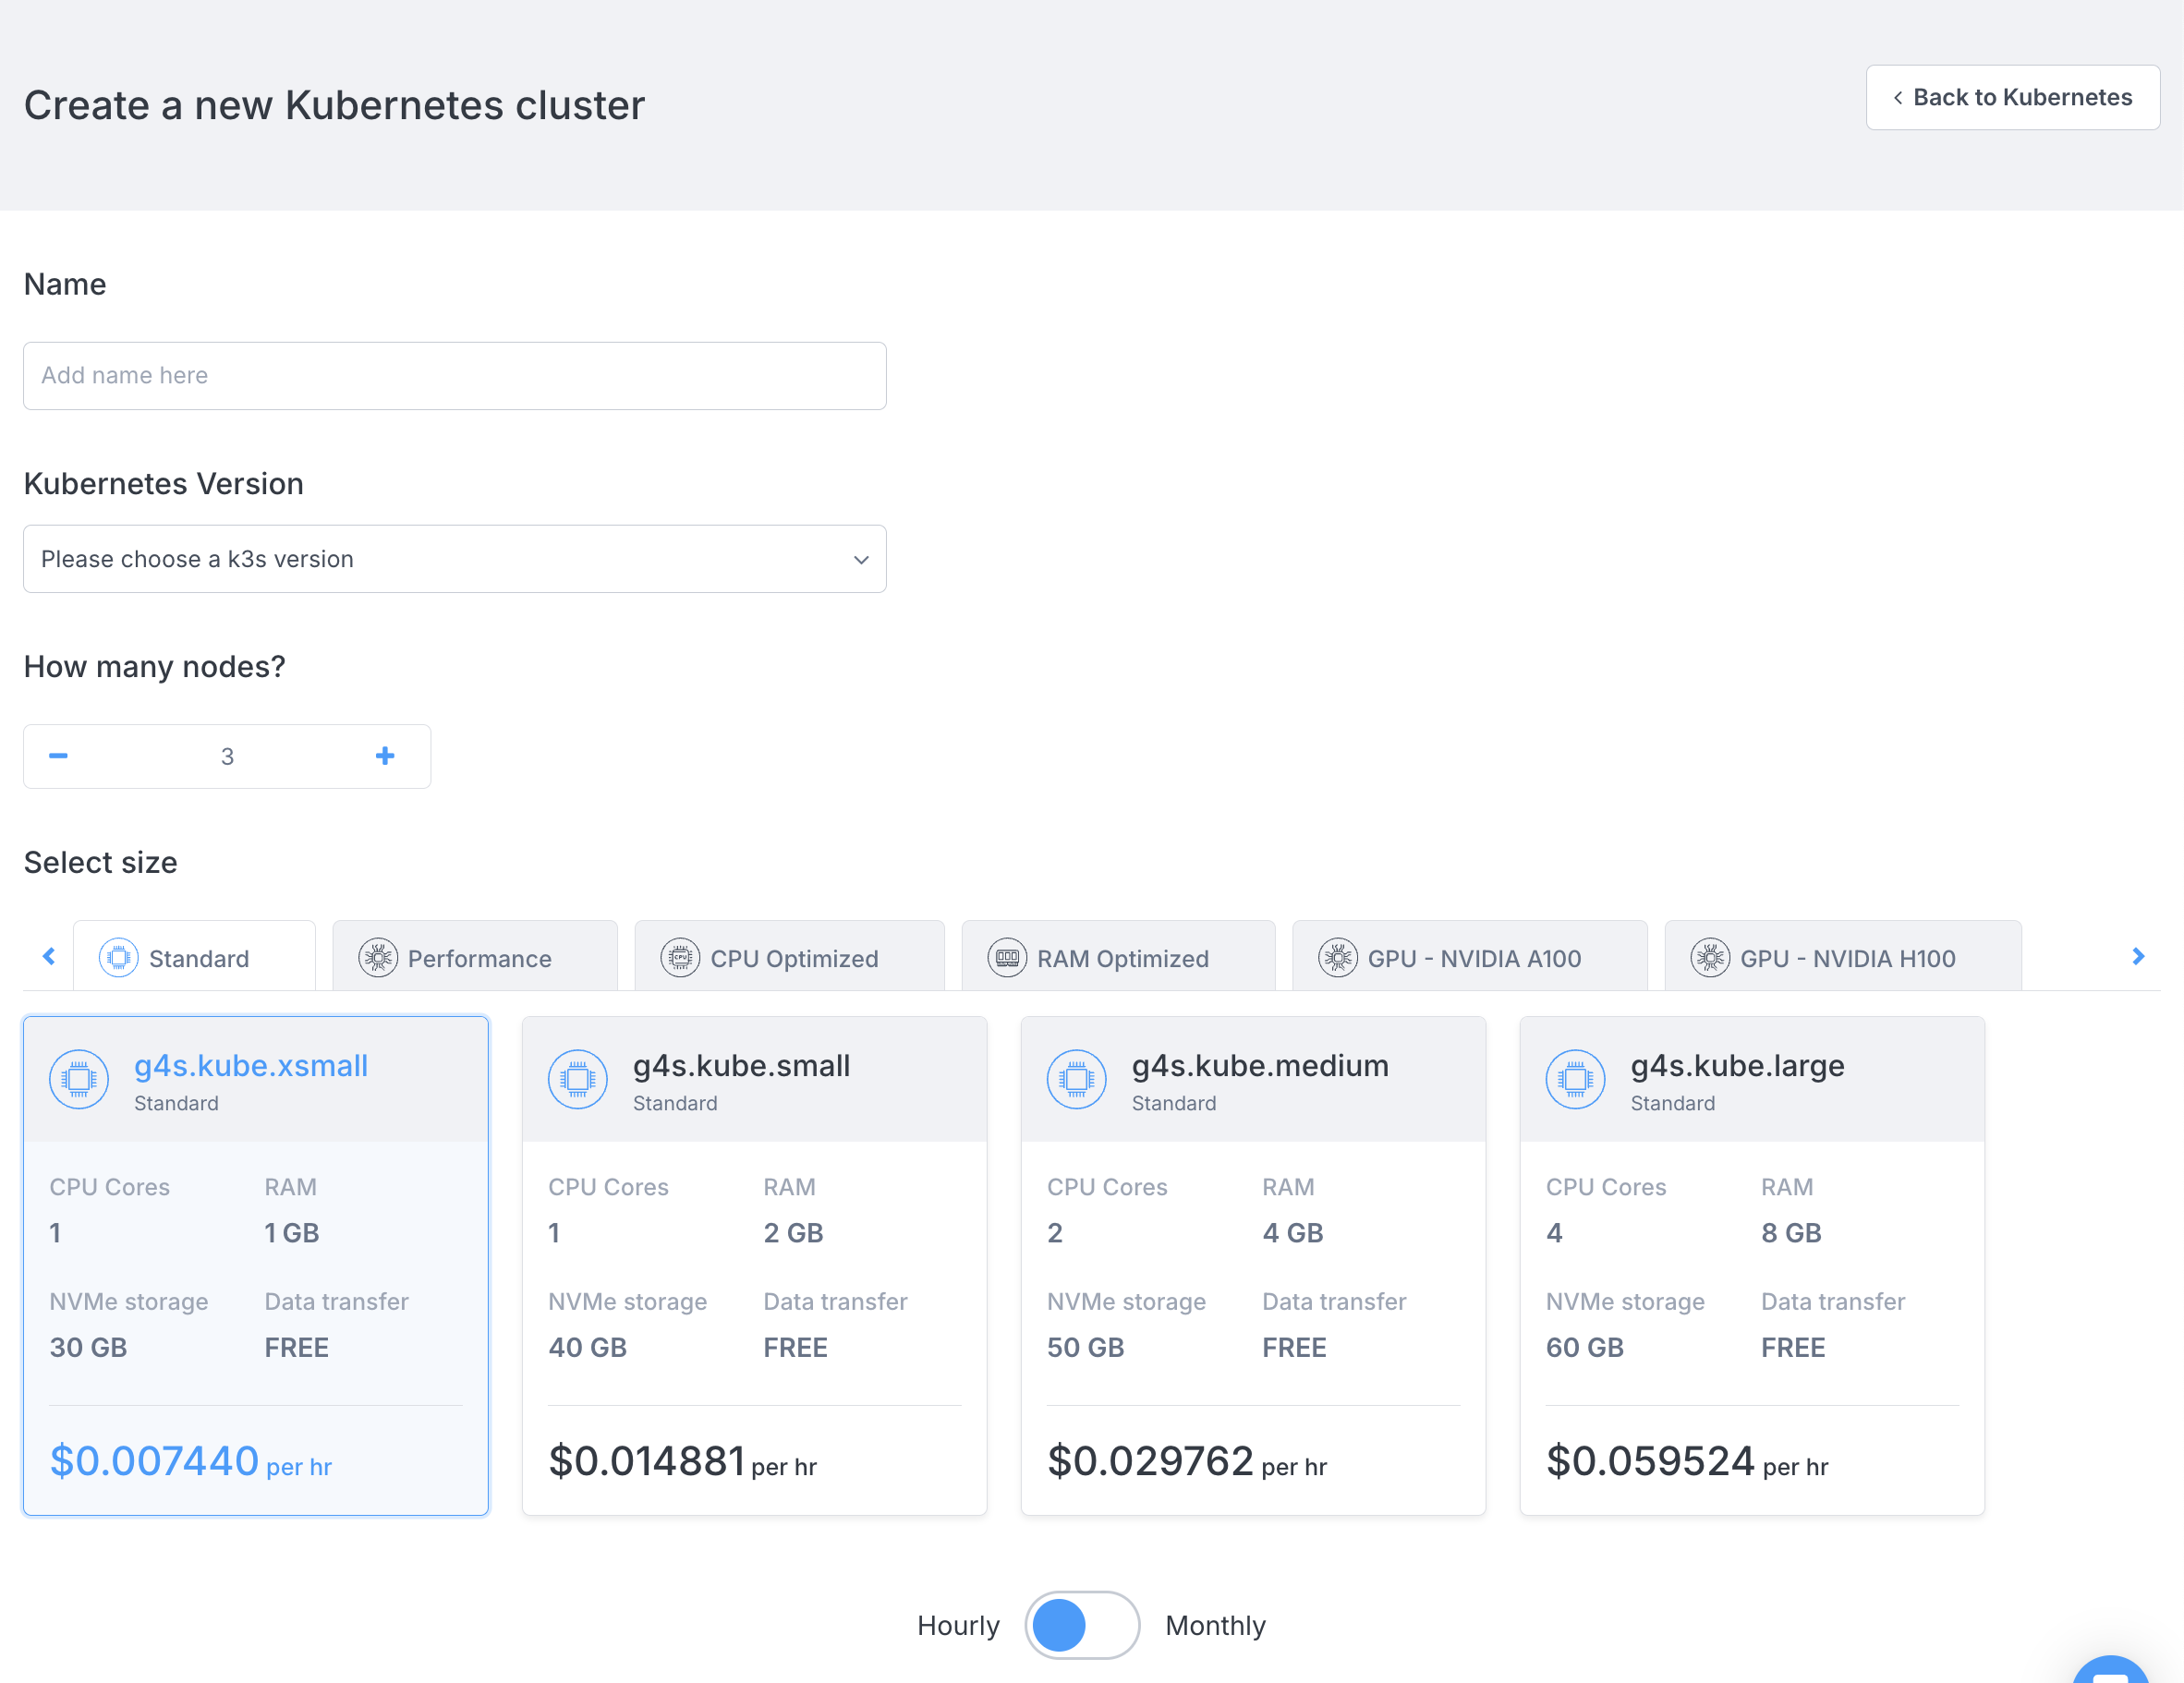
Step 3 - Provide your cluster details
The sections on this page give you options for the cluster you are about to create. Complete the required fields to create your cluster.
-
Name
Provide a name for your cluster. No spaces allowed.
-
Kubernetes version
Select the desired Kubernetes version.
-
Number of nodes
Kubernetes clusters on Civo can have multiple node pools - this is the number you want to launch in the cluster's initial node pool. This can be scaled up and down once the cluster is running, and does not include the control plane node, which is handled by Civo.
-
Network
If you have created custom networks in this region, choose one of them here. Custom networks allow you to define private networking within a region, which allows you to prevent some resources from being routable to the public internet. Civo Kubernetes clusters always have a public IP address.
-
Firewall
If you have configured existing firewalls in this region, select one of them for this cluster, or create a new firewall and specify which port(s) to open. Firewall rules can be customised after creation.
-
Node size
The specifications for the machines in the initial node pool. These are priced per node, per hour. The "Hourly/Monthly" slider allows you to estimate the cost per month or per hour of the cluster running. For more information, see the Billing section.
- Sizes or configurations may not be available due to quota on your account or the number of nodes you have chosen in section 2 above
- Depending on the applications you want to run on your cluster, you may need to select larger nodes.
-
Advanced options
This section allows you to optionally configure advanced options, including the Container Networking Interface (CNI) and cluster type.
noteFlannel and Talos Linux support are being deprecated.
-
Marketplace
Use Marketplace to remove applications and prevent them from being installed by default, or add applications to start alongside your cluster.
Step 4 - Create your cluster
When you are satisfied with your initial cluster configuration, select "Create cluster" to finalize the creation and open the cluster's dashboard page. It takes a moment to become active, and displays the status during setup.
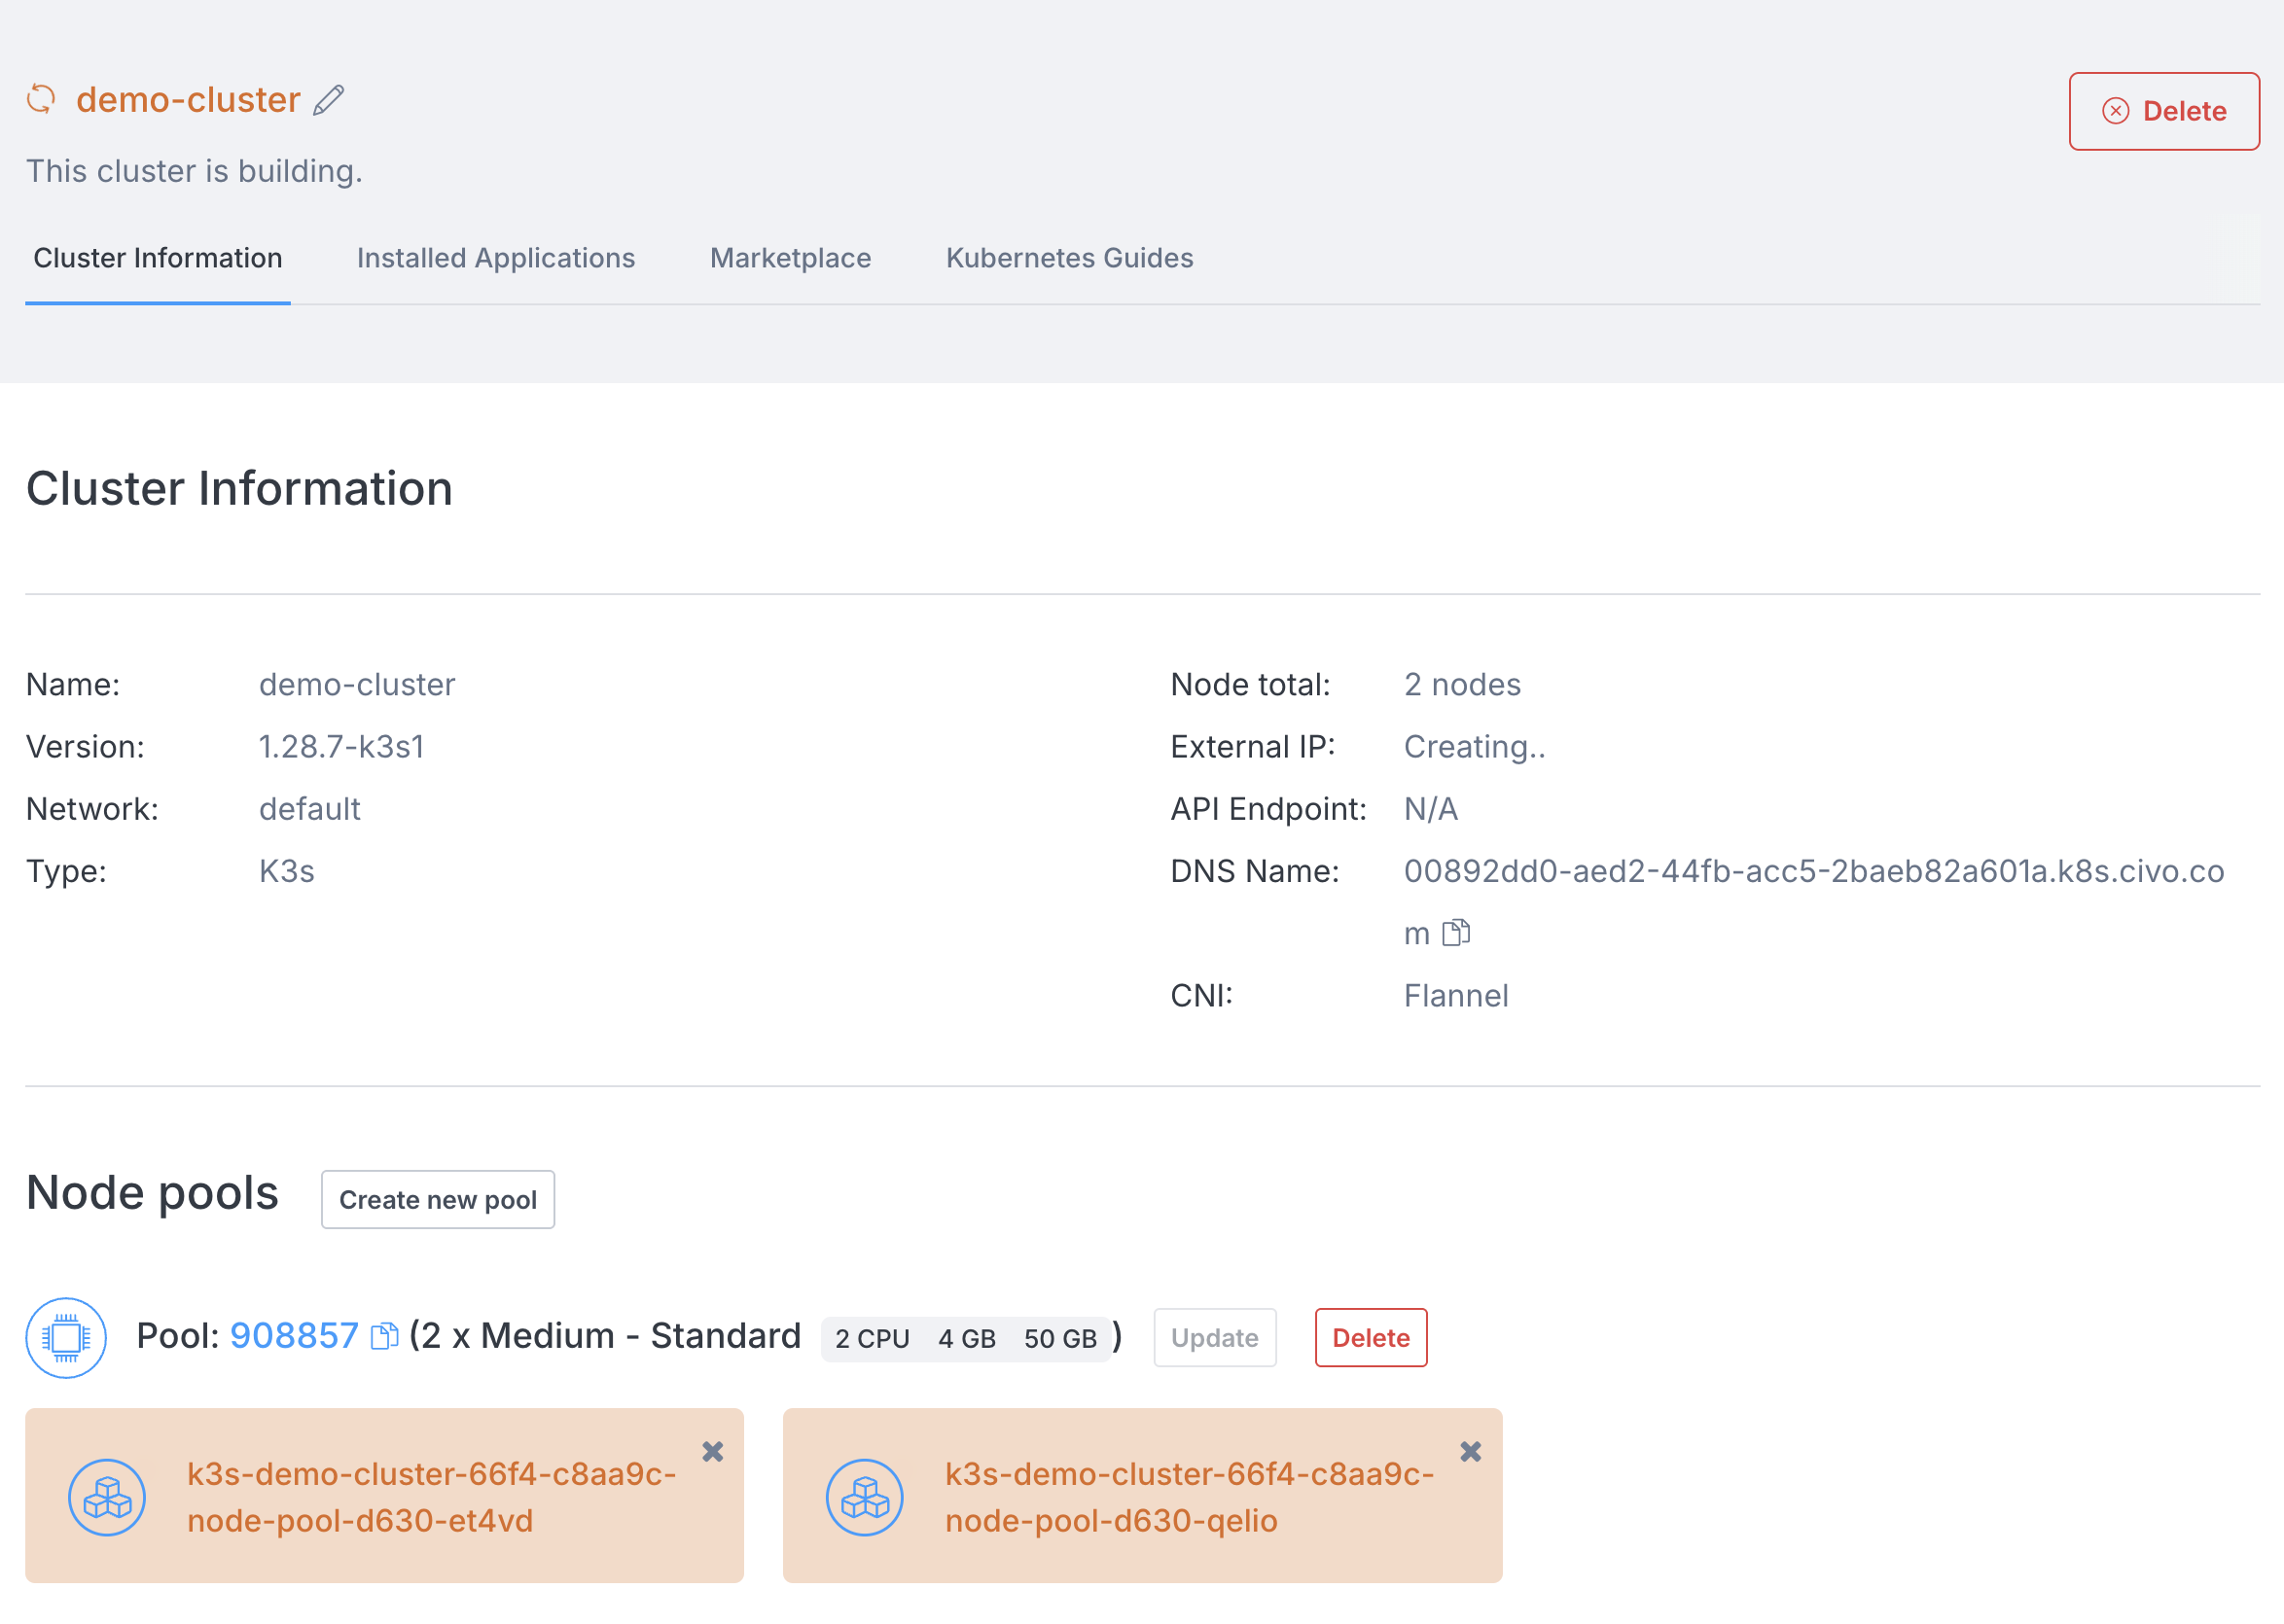
Step 5 - Connect to your cluster
Once running, you can use kubectl and the downloaded kubeconfig file from the cluster's page to interact with your cluster. You will find the kubeconfig file for download in the "Cluster information" section:

Creating a Cluster Using the Civo CLI
You can create a Civo Kubernetes cluster on the command line by running the civo kubernetes create command, with optional parameters.
Using the CLI with No Options
If you run civo kubernetes create on its own, it creates a cluster in the currently-selected region with a generated name, some default options, and return.
Using the CLI command with Options
The CLI allows you to specify any number of options for your cluster, from the size of the nodes in the initial node pool to the firewall rules to set up, the version of Kubernetes to use, and more. A full list of options for cluster creation can be found by running civo kubernetes create --help.
As an example, the following command will create a 4-node K3s cluster called "civo-cluster" of g4s.kube.medium nodes, with a custom firewall with only port 6443 open, in the LON1 region, and wait for the cluster to become live before saving the kubeconfig alongside your current ~/.kube/config file.
civo kubernetes create civo-cluster -n 4 -s g4s.kube.medium --cluster-type k3s --create-firewall --firewall-rules "6443" --region LON1 --wait --save --merge --switch`
When you run the above, the Civo CLI shows you the completion time and confirmation that your kubeconfig has been merged in, and the current context has been switched to the new cluster:
Merged with main kubernetes config: ~/.kube/config

Access your cluster with:
kubectl get node
The cluster civo-cluster (ac1447d4-d938-4c0d-8eb6-7844b7f0a4dd) has been created in 1 min 28 sec
Downloading the Cluster kubeconfig from the CLI
Once running, you can use kubectl and the kubeconfig file from the cluster to interact with it. If you did not save the kubeconfig on cluster creation, you can use civo kubernetes config civo-cluster --save to download the configuration and access your cluster.
Viewing Cluster Information
Once you have a running cluster, you can get a nicely-formatted information screen by running civo kubernetes show [cluster_name]. You can also use a partial name or unique section of the ID to have it show, like in the following example - as long as the part of the name you input matches only one cluster, you'll get the cluster information returned:
$ civo k8s show demo
                    ID : 73866847-749a-43b9-8168-65bc3cc12ffc
                  Name : docs-demo
          ClusterType : k3s
                Region : LON1
                Nodes : 4
                  Size : g4s.kube.medium
                Status : ACTIVE
              Firewall : k3s-cluster-docs-demo-0377-b72777
              Version : 1.23.6-k3s1
          API Endpoint : https://74.220.27.254:6443
          External IP : 74.220.27.254
          DNS A record : 73866847-749a-43b9-8168-65bc3cc12ffc.k8s.civo.com
Installed Applications : Traefik-v2-nodeport, metrics-server

Pool (a1cd9b):
+-------------------------------------------------+---------------+----------+-----------------+-----------+----------+---------------+
| Name                                            | IP            | Status   | Size            | Cpu Cores | RAM (MB) | SSD disk (GB) |
+-------------------------------------------------+---------------+----------+-----------------+-----------+----------+---------------+
| k3s-docs-demo-614e-9e2f67-node-pool-1372-dnz9h  | 74.220.27.254 | ACTIVE   | g4s.kube.medium |         1 |     2048 |            40 |
| k3s-docs-demo-614e-9e2f67-node-pool-1372-2u195  |               | BUILDING | g4s.kube.medium |         1 |     2048 |            40 |
| k3s-docs-demo-614e-9e2f67-node-pool-1372-ts645  |               | ACTIVE   | g4s.kube.medium |         1 |     2048 |            40 |
| k3s-docs-demo-614e-9e2f67-node-pool-1372-4xirw  |               | BUILDING | g4s.kube.medium |         1 |     2048 |            40 |
+-------------------------------------------------+---------------+----------+-----------------+-----------+----------+---------------+

Labels:
kubernetes.civo.com/node-pool=a1cd9b96-3707-4998-8fc3-209144ad234c
kubernetes.civo.com/node-size=g4s.kube.medium

Applications:
+---------------------+-----------+-----------+--------------+
| Name                | Version   | Installed | Category     |
+---------------------+-----------+-----------+--------------+
| Traefik-v2-nodeport |       2.6 | true      | architecture |
| metrics-server      | (default) | true      | architecture |
+---------------------+-----------+-----------+--------------+
You can see that the four nodes that were requested are running, they are the size they were specified to be above, and the cluster has the default installed applications, Traefik and the Kubernetes metrics-server up as well. Any changes, such as scaling your cluster up/down, are immediately reflected on this status screen as shown in the BUILDING state of the two nodes.
You will need to have set the correct Civo region for where the cluster was created when you set up Civo CLI, or specify it in the command with --region to be able to view the cluster information.