Kubernetes Load Balancers

Overview

On Civo, Kubernetes cluster LoadBalancer objects are external to your cluster, but created and managed as part of your cluster's service definitions. In other words, you create them like other Service objects in Kubernetes as part of your cluster definition, but their state is handled by the Cloud Controller Manager that speaks to the Civo API. This allows you to have a service that routes traffic into your cluster externally, balancing the traffic between the nodes.

Civo Kubernetes load balancers are a managed implementation of the Kubernetes External Load Balancer. This means if you create a Service object of type LoadBalancer the Civo API will detect this, and on assigning the load balancer a public IP address will start to account for its usage as part of your billing and quota.

Kubernetes load balancers, like all Civo resources, are billed hourly according to the current pricing. Additional costs apply for each subsequent 10,000 concurrent requests you configure the load balancer to handle.

Creating a Kubernetes load balancer

Being strictly a Kubernetes object, Kubernetes load balancers must be defined in a running cluster. There is no way to start a Kubernetes load balancer for a cluster from the dashboard, as they are application-specific.

Definining a load balancer can be done either using kubectl to define a Service in your cluster, or by launching a Marketplace application that defines one for you. The documentation below shows the creation of a load balancer using kubectl as Marketplace applications configure them automatically.

To define a Civo Kubernetes load balancer object, at a minimum you need to define the Service and its type as LoadBalancer, such as:

apiVersion: v1
kind: Service
metadata:
name: civo-lb-service
spec:
type: LoadBalancer
selector:
app: example-app
ports:
- protocol: TCP
port: 5000
targetPort: 8443
name: example-app

This should be applied to your cluster with kubectl apply -f loadbalancer.yaml.

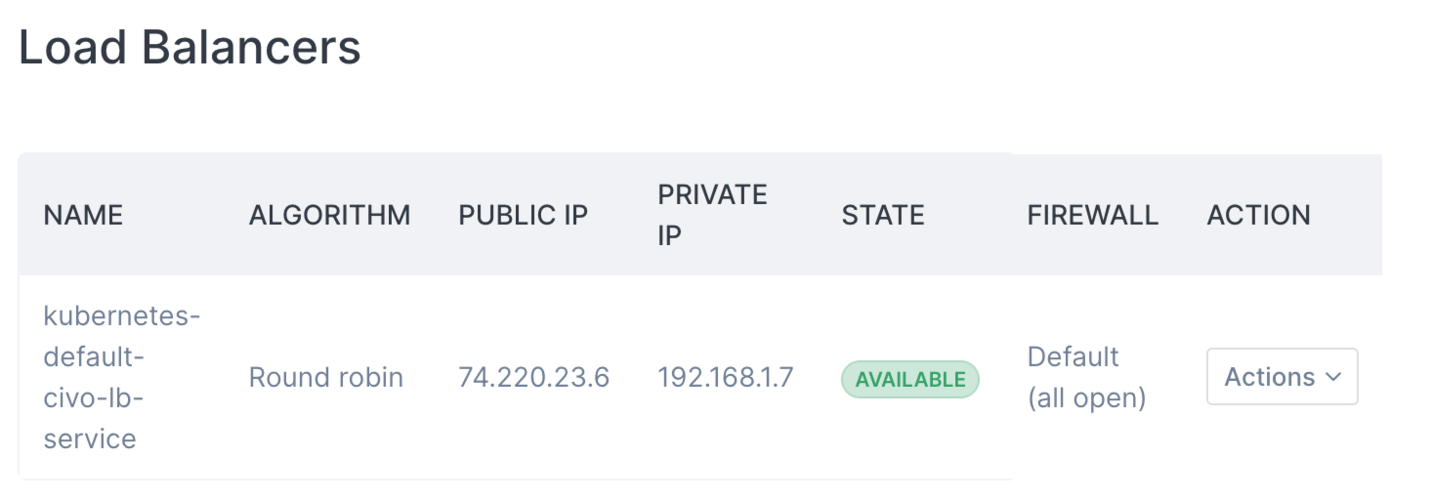
As mentioned above, creating a load balancer relies on the Civo Cloud Controller Manager sending the appropriate request to the Civo API to handle the creation and configuration of the Load Balancer according to your specification. This system means that if you create any Service with type LoadBalancer, it will be picked up by the Civo API and as part of the Load balancers listing as well as on the cluster's dashboard page in your account:

Kubernetes load balancer as displayed on the Civo dashboard

There are several available configuration options for Kubernetes load balancers, detailed below.

Kubernetes load balancer configuration options

The Civo load balancer specification allows optional configuration elements. These are detailed below. Configuration options for your Load Balancer are to be specified in the the appropriate block of your LoadBalancer service definition.

Algorithm

The load balancing algorithm, if provided, is one of round_robin or least_connections. The default, if not provided, is round_robin. This is specified in a metadata/annotation prefixed by kubernetes.civo.com/ as follows:

  annotations:
kubernetes.civo.com/loadbalancer-algorithm: least_connections

or

  annotations:
kubernetes.civo.com/loadbalancer-algorithm: round_robin

External traffic policy

The external traffic policy, if provided, is one of Cluster or Local. Cluster, the default, means routing of external traffic to cluster-wide endpoints and ensures evenness of the request load across . Local is only for HTTP traffic, and preserves the client source IP using a X-Forwarded-For header added to the request, with the side effect of less efficient load balancing.

The specification for the external traffic policy is made through a spec in your Service definition:

spec:
type: LoadBalancer
externalTrafficPolicy: Cluster

or

spec:
type: LoadBalancer
externalTrafficPolicy: Local

Session affinity configuration

You can ensure that all requests from a particular client IP get routed to the same Pod within a given time frame by setting the optional session affinity configuration. The structure of this optional configuration is as follows.

sessionAffinity: ClientIP

If you include the first line, you can also optimally set the timeout of a session in seconds on subsequent lines. The default value of timeoutSeconds is 10800, i.e. 3 hours, which will be used if not provided.

spec:
type: LoadBalancer
sessionAffinity: ClientIP
sessionAffinityConfig:
clientIP:
timeoutSeconds: 480

Firewall ID

The firewall configuration for your Load Balancer is specified in an annotation kubernetes.civo.com/firewall-id that takes the ID of your chosen firewall as input, such as:

metadata:
annotations:
kubernetes.civo.com/firewall-id: 3eb6534a-4f81-4bb9-9d91-a382391f18ad

The firewall must be specified using its ID, rather than displayed name.

If a firewall is not specified in an annotation, the Load Balancer will use the default firewall and not close any ports.

note

The firewall ID must be found in the same region as your cluster, otherwise the load balancer will present an error of the specified resource not being found.

Proxy Protocol

Civo Load Balancers support the HAProxy Proxy Protocol. Use of the Proxy Protocol allows for the preservation of client IP information to supporting services such as NginX. Not enabled by default.

Supported values are send-proxy and send-proxy-v2.

Proxy Protocol can be enabled with:

metadata:
annotations:
kubernetes.civo.com/loadbalancer-enable-proxy-protocol: send-proxy

Reserved IP address

If you have reserved a public IP address you can assign it to a Kubernetes load balancer to ensure public routing into a service remains constant. The annotation for your service definition is as follows:

metadata:
annotations:
kubernetes.civo.com/ipv4-address: "value of reserved IP address"
tip

You can update any of the configuration options detailed above in your service definition and re-apply it to your cluster without having to remove and re-create the load balancer.

Maximum concurrent requests

By default, Kubernetes load balancers are configured to handle 10,000 concurrent requests. You can increase this limit by setting the annotation kubernetes.civo.com/max-concurrent-requests to a value above 10000. The annotation for your service definition is as follows:

metadata:
annotations:
kubernetes.civo.com/max-concurrent-requests: "20000"
warning

If you update the maxmimum concurrent requests annotation, the load balancer will have a brief period of downtime as it rebuilds.

An additional load balancer charge will be levied for each 10,000 requests above the default limit.

Viewing details of a Kubernetes load balancer

You can view the current configuration of any load balancers both on the load balancers listing page, as well as on the page of the cluster where the load balancer is configured:

Kubernetes load balancer as displayed on the Civo dashboard

You can also view more specific details of a particular load balancer by dropping down the "Actions" menu and selecting "View".

Deleting a Kubernetes load balancer

The Cloud Controller Manager (CCM) running in your cluster will handle the deletion of a Civo load balancer once the accompanying Service is deleted from your cluster. You can delete the load balancer, and stop billing for the load balancer, by either deleting the service definition using the manifest file as in the example below, or by deleting the service from the cluster itself:

$ kubectl delete -f loadbalancer.yaml
service "civo-lb-service" deleted

The charge for the Load Balancer and additional public IP will end when the Service object is deleted.