
This tutorial will show you how to deploy your own registry on Kubernetes for storing Docker images. You will also learn how to set up TLS certificates which will be issued for free from LetsEncrypt.org.
Conceptual architecture
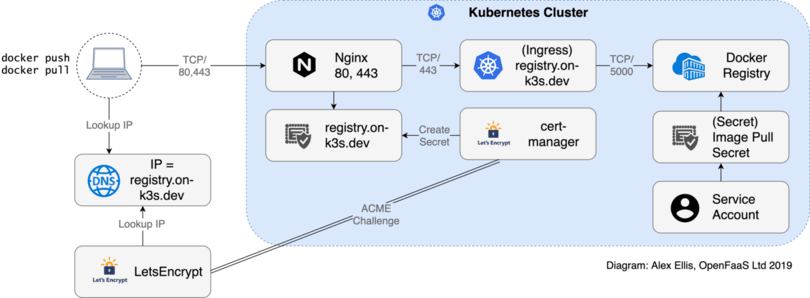
You will learn how each part in the image above works together by following the tutorial.
Do I need my own container registry?
The primary purpose of a container registry is to store and host artifacts packaged in the Docker or OCI-image format.
At present there are managed registries for container images offered by almost every cloud provider. Even companies who do not offer compute resources are starting to offer registries, such as jFrog, GitLab.com, Docker Inc, and GitHub.com.
So why would you want to set up your own? Here are a few reasons:
Latency: Hosting a registry inside your Kubernetes cluster is the fastest possible way to push and pull images. This matters for use-cases such as auto-scaling and affects the overall speed to deploy from a CI/CD pipeline.
Costs: Bandwidth in and out of a datacentre is rarely free, let alone across regions. Hosting Docker images where they are produced and consumed keeps costs to the absolute minimum.
Regulations: Some regulations and legal restrictions, such as GDPR, may mean that storing artifacts with a SaaS provider is just not tenable.
Security: Although we don't explore it in the scope of this tutorial, additional security can be added to self-hosted registries using Open Source software like the CNCF's Harbor. Harbor scans Docker images for CVEs and other vulnerabilities.
Automation & portability: You may be able to automate a hosted registry on AWS, but completely different code is required to automate a registry on GCP. By using an Open Source registry that we can self-host, we regain portability, allowing you to host your project where you want.
Ease of use: It is relatively easy to integrate one or more registries into an existing Kubernetes cluster, in any availability region that you choose.
Pre-requisites
-
A domain name, or sub-domain which you own. You need to be able to update
DNS A recordsfor your domain. For example, you can purchase them at domains.google. You will be able to manage DNS via Civo. -
Docker - we'll use a Docker container to generate some of our configuration.
-
Kubernetes - this tutorial is written with k3s in mind, but also works on full Kubernetes with a few tweaks.
If you're a Civo user, then we'll be hosting our registry on Civo Cloud. You can use k3sup (ketchup) to deploy Kubernetes on your own Instances within a few minutes.
-
helm - a packaging tool used to install cert-manager and docker-registry. If you prefer to not use helm's server-side component called
tiller, rest assured you can use thehelm templatecommand to avoid installingtiller. -
cert-manager - a tool by JetStack which provides and renews TLS certificates from LetsEncrypt.
-
docker-registry - This is a helm chart for Docker's own open source registry.
-
nginx-ingress - The Nginx IngressController configures instances of Nginx to handle incoming HTTP/S traffic.
Note: If you are using
k3s, you can skip installing Nginx IngressController
Tutorial
We'll first install helm, then tiller, then Kubernetes users can add Nginx in Host mode and k3s users can skip this because they will be using Traefik. After that we'll add cert-manager and an Issuer to obtain certificates, followed by the registry. After everything is installed, we can then make use of our registry using the password created during the tutorial. You'll finish off by testing everything end-to-end, and if you get stuck, there are some helpful tips on how to troubleshoot.
Some components are installed in their own namespaces such as cert-manager, all others will be installed into the default namespace. You can control the namespace with kubectl get --namespace/-n NAME or kubectl get --all-namespaces/-A.
There will also be some ways to take the tutorial further in the appendix.
Install the helm CLI/client
To install the latest helm, On MacOS and Linux::
curl https://raw.githubusercontent.com/kubernetes/helm/master/scripts/get | bash
Or via Homebrew on MacOS:
brew install kubernetes-helm
For Windows users, go to helm.sh.
Install tiller
Create Role-Based Access Control (RBAC) permissions for tiller:
kubectl -n kube-system create sa tiller \
  && kubectl create clusterrolebinding tiller \
  --clusterrole cluster-admin \
  --serviceaccount=kube-system:tiller
Install the server-side Tiller component on your cluster:
helm init --skip-refresh --upgrade --service-account tiller
Note: this step installs a server component in your cluster. It can take anywhere between a few seconds to a few minutes to be installed properly. You should see tiller appear on:
kubectl get pods -n kube-system.
Now wait for tiller to become ready:
kubectl rollout status -n kube-system deploy/tiller-deploy

deployment "tiller-deploy" successfully rolled out
Your built-in IngressController with k3s
k3s comes with a load balancer called Traefik. If you are not using using a k3s service, we will need to set up an IngressController.
For k3s, don't install an IngressController, you already have one, skip ahead.
Add an IngressController if not using k3s
If you're not using k3s, then install Nginx Ingress instead:
helm install stable/nginx-ingress --name nginxingress --set rbac.create=true,controller.hostNetwork=true,controller.daemonset.useHostPort=true,dnsPolicy=ClusterFirstWithHostNet,controller.kind=DaemonSet
Install cert-manager
You can now install cert-manager, the version used in this guide is v0.9.1. Check on the cert-manager page for the appropriate version number to edit into the commands below.
# Install the CustomResourceDefinition resources separately
kubectl apply --validate=false -f https://raw.githubusercontent.com/jetstack/cert-manager/v0.13.1/deploy/manifests/00-crds.yaml

# Create the namespace for cert-manager
kubectl create namespace cert-manager

# Label the cert-manager namespace to disable resource validation
kubectl label namespace cert-manager certmanager.k8s.io/disable-validation=true

# Add the Jetstack Helm repository
helm repo add jetstack https://charts.jetstack.io

# Update your local Helm chart repository cache
helm repo update

# Install the cert-manager Helm chart
helm install \
  --name cert-manager \
  --namespace cert-manager \
  --version v0.9.1 \
  jetstack/cert-manager
See also: cert-manager v0.9.0 docs
Create a ClusterIssuer
The way that cert-manager issues certificates is through an Issuer. The Issuer can issue certificates for the namespace it is created in, but a ClusterIssuer can create certificates for any namespace, so that's the one we will use today.
Save the following as issuer.yaml:
apiVersion: certmanager.k8s.io/v1alpha2
kind: ClusterIssuer
metadata:
  name: letsencrypt-prod
  namespace: default
spec:
  acme:
    # The ACME server URL
    server: https://acme-v02.api.letsencrypt.org/directory
    # Email address used for ACME registration
    email: user@example.com
    # Name of a secret used to store the ACME account private key
    privateKeySecretRef:
      name: letsencrypt-prod
    # Enable the HTTP-01 challenge provider
    solvers:
    - http01:
        ingress:
          class: traefik
- Edit the file:
Edit the line: email: user@example.com to use your email address.
If using Nginx instead of k3s and Traefik, then edit the following:
    solvers:
    - http01:
        ingress:
          class: nginx
Then run kubectl apply -f issuer.yaml.
Note you may receive an error, if you do then wait 1-2 minutes and try again whilst cert-manager registers itself
You can check the status of your issuer like this:
kubectl describe clusterissuer/letsencrypt-prod
Look for it to become Ready.
Configure DNS
For this tutorial a domain on-k3s.dev was purchased from Google Domains to show a worked example. If you are using a different domain registrar the following screens will look broadly similar.

Once you have purchased your domain, you need to point the DNS records at the hosts in the k3s cluster where Nginx is going to be listening on port 80 (HTTP) and port 443 (HTTPS/TLS).

You can find your IP addresses with the Civo Dashboard UI, or by typing in civo instance ls through the CLI.
Install the registry
At this stage we can install the registry, but we are going to install it without persistence. If you need persistence see the appendix for how to do this.
Save the following as install-registry.sh:
export SHA=$(head -c 16 /dev/urandom | shasum | cut -d " " -f 1)
export USER=admin

echo $USER > registry-creds.txt
echo $SHA >> registry-creds.txt

docker run --entrypoint htpasswd registry:2 -Bbn admin $SHA > ./htpasswd

helm install stable/docker-registry \
  --name private-registry \
  --namespace default \
  --set persistence.enabled=false \
  --set secrets.htpasswd=$(cat ./htpasswd)
You will need to have docker installed and ready for this step. If it's not started, then start it up now.
Then run the script:
chmod +x install-registry.sh
./install-registry.sh
It will install the Docker registry from the docker-registry chart.
Later, when you want to use your registry you can find your username and password in the registry-creds.txt file.
Get a TLS certificate for the registry
Now let's get a TLS certificate for the registry.
Save ingress.yaml, then edit it:
---
apiVersion: extensions/v1beta1
kind: Ingress
metadata:
  name: registry
  namespace: default
  annotations:
    certmanager.k8s.io/cluster-issuer: letsencrypt-prod
    kubernetes.io/ingress.class: "traefik"
    nginx.ingress.kubernetes.io/proxy-body-size: 50m
  labels:
    app: docker-registry
spec:
  tls:
  - hosts:
    - registry.example.com
    secretName: registry.example.com-cert
  rules:
  - host: registry.example.com
    http:
      paths:
      - path: /
        backend:
          serviceName: private-registry-docker-registry
          servicePort: 5000
Update the file:
- Everywhere that you see
registry.example.com, replace it with your domain. - If using Nginx, then change this line:
kubernetes.io/ingress.class:to say"nginx"
Note the special setting: .ingress.kubernetes.io/proxy-body-size: 50m. This value can be customized and allows large Docker images to be stored in the registry.
Now run:
kubectl apply -f ingress.yaml
Check the certificate
Now check the certificate with the following:
kubectl get cert -n default

NAME                       READY   SECRET                     AGE
registry.on-k3s.dev-cert   True    registry.on-k3s.dev-cert   47s
For any of the entries listed, you can check the status with kubectl describe:
kubectl describe cert/registry.on-k3s.dev-cert

Status:
  Conditions:
    Last Transition Time:  2019-08-29T13:26:20Z
    Message:               Certificate is up to date and has not expired
    Reason:                Ready
    Status:                True
    Type:                  Ready
  Not After:               2019-11-27T12:26:18Z
Events:
  Type    Reason              Age   From          Message
  ----    ------              ----  ----          -------
  Normal  Generated           64s   cert-manager  Generated new private key
  Normal  GenerateSelfSigned  64s   cert-manager  Generated temporary self signed certificate
  Normal  OrderCreated        63s   cert-manager  Created Order resource "registry.on-k3s.dev-cert-3194477141"
  Normal  OrderComplete       31s   cert-manager  Order "registry.on-k3s.dev-cert-3194477141" completed successfully
  Normal  CertIssued          31s   cert-manager  Certificate issued successfully
Look for hints in the Status and Events sections.
Now let's test the registry
export DOCKER_PASSWORD="" # Populate this with your password used above
export DOCKER_USERNAME="admin"
export SERVER="registry.example.com"

echo $DOCKER_PASSWORD | docker login $SERVER --username $DOCKER_USERNAME --password-stdin
Replace
example.comin the above commands with your domain
Sometimes it can take a few minutes for your new domain to become available. If it's an existing domain, then the DNS record should be synchronised already.
Once logged in, you can tag an image from the Docker Hub and push it into your own registry.
export SERVER="registry.example.com"

docker pull functions/figlet:latest

docker tag functions/figlet:latest $SERVER/functions/figlet:latest

docker push $SERVER/functions/figlet:latest
Now that we can log into our registry and push images, we need to enable the same from within our cluster. This is done by attaching an image pull secret to the namespace's service account.
export DOCKER_PASSWORD="" # Populate this with your password used above
export DOCKER_USERNAME="admin"

kubectl create secret docker-registry my-private-repo \
    --docker-username=$DOCKER_USERNAME \
    --docker-password=$DOCKER_PASSWORD \
    --docker-server=$SERVER \
    --namespace default
Now edit the service account and grant it permission to access the secret:
kubectl edit serviceaccount default -n default
Add the following and save:
imagePullSecrets:
- name: my-private-repo
To check that it's available in Kubernetes, you can run the following OpenFaaS function, which prints an ASCII logo and then exits.
export SERVER=""

kubectl run --rm -t -i figlet --restart Never --image $SERVER/functions/figlet:latest -- figlet Kubernetes

 _  __     _                          _
| |/ /   _| |__   ___ _ __ _ __   ___| |_ ___  ___
| ' / | | | '_ \ / _ \ '__| '_ \ / _ \ __/ _ \/ __|
| . \ |_| | |_) |  __/ |  | | | |  __/ ||  __/\__ \
|_|\_\__,_|_.__/ \___|_|  |_| |_|\___|\__\___||___/

pod "figlet" deleted
This will print out the Kubernetes logo in ASCII art and then delete the Pod used to run the code.
If it didn't work, find out why with this command:
kubectl get events --sort-by=.metadata.creationTimestamp -n default
Taking things further (Appendix)
You can take things further and start to explore more advanced use-cases for your registry.
Enable persistence
It is desirable, but not essential to enable persistence for a registry. When available, persistence means that if the registry crashes, then the images can be recovered.
There are two routes to enable persistence.
-
Use S3, or S3-compatible buckets S3 is a protocol and standard for storing objects. You can use an AWS account and S3 as a backing for your registry's storage, or you can install Minio onto your Civo instances and use it as an S3 target instead.
-
Use PersistentVolumes in Kubernetes Storage in Kubernetes comes in the shape of Volumes. When volumes are not ephemeral, then they are called PersistentVolumes or (PVs). In order to use PVs with k3s, you'll have to install Rancher's Longhorn project.
The helm chart explains the options for using PVs or S3: docker-registry chart.
Wrapping up
We have now built a Kubernetes cluster using k3s and have a working registry with TLS, authentication and a public URL.
helm provided us with charts (packaged software for Kubernetes) docker-registry gave us a registry with authentication cert-manager provided TLS certificates from LetsEncrypt Traefik was built into k3s, or we used Nginx on upstream Kubernetes.
You can now share the registry with your team or use it in your CI/CD pipeline using a tool like Jenkins to build and ship Docker images. You may like to try installing other software to start building applications on Kubernetes such as OpenFaaS.


